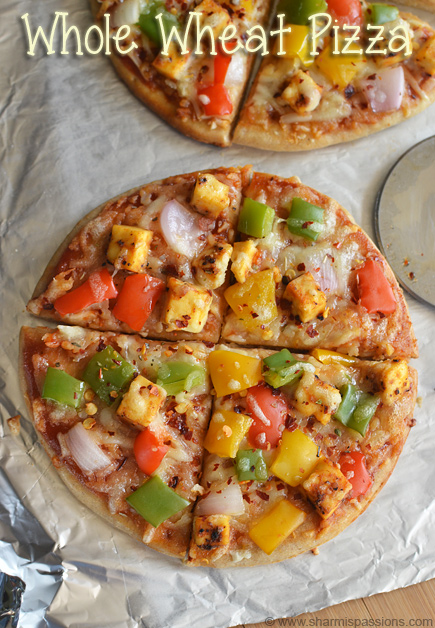
Paneer Pizza, a beloved Italian dish with a desi twist, is a real treat when you're craving something cheesy, homemade, and delicious. I usually cook this as a weekend treat or for family pizza nights. What makes this paneer pizza so special is that it's made from scratch, including the base. You can create a delicious pizza that tastes as good as the ones from your favorite restaurants.
The best part of homemade pizza is making it together as family from rolling out the dough to layering the toppings and watching the cheese melt in the oven, it's a fun and satisfying experience. This recipe turns a family favorite once you try it.
Jump to:
About Paneer Pizza
Paneer Pizza is a desi twist to the classic Italian pizza. This recipe uses paneer as the main topping along with veggies and cheese. This recipe combines the rich Indian flavors of paneer with the cheesy goodness of a pizza, The use of wheat flour gives a wholesome touch, making it healthier than white flour alternatives.
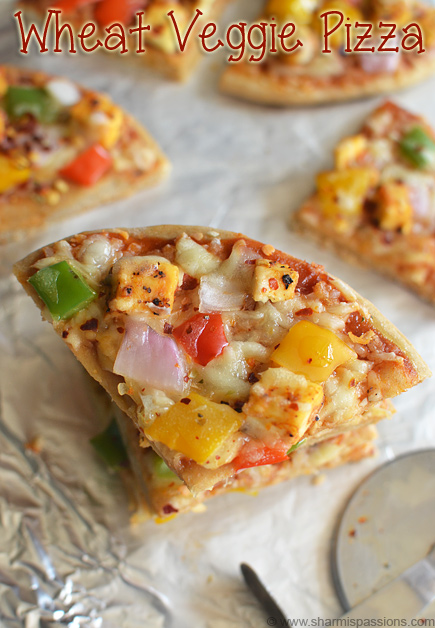
This paneer pizza recipe has its own amazing taste, texture and flavor - the soft juicy paneer cubes, crunchy capsicum, and sweet onions come together with cheese and flavorful sauces, giving bursts of flavor in every bite. Paneer soaks up flavors beautifully, which makes it a great topping for pizza.
You can either bake the base first and then add the toppings or bake it all together. The recipe works well either way and gives a delicious golden crust with bursting cheese.
This homemade paneer pizza recipe is not just about taste, but also about how versatile it is. You can customize it the way you want. You can add more vegetables, make it spicy, or adjust cheese based on your own taste and preference.
Paneer Pizza Ingredients
- Wheat flour - Used to make the pizza base slightly healthier.
- Active dry yeast, sugar, warm water - These help the dough rise and become airy and fluffy.
- Olive oil - Adds softness and helps knead the dough smoothly.
- Pizza sauce, tomato sauce - To spread over the base for a tangy taste.
- Black pepper powder, oregano - These are mixed into the sauce for a mild spice and flavor.
- Paneer - Use fresh and soft paneer cubes.
- Onion, capsicum - Adds color, crunch, and flavor to the dish.
- Mozzarella cheese - Melts well and gives that classic cheesy pull.
- Oregano, chilli flakes - Sprinkled on top after baking for extra flavor and heat.
Similar Recipes
Why This Recipe Works
- This recipe is made from scratch using wheat flour for a healthier version.
- Balanced flavors with perfect crust- soft inside, crisp outside.
- Easily customizable with toppings of your choice.
- Perfect for all ages - from kids to grown-ups.
- Uses homemade base which tastes better than store-bought.
- Cheesy, flavor-packed, and satisfying delight.
How to make Paneer Pizza Recipe Step by Step
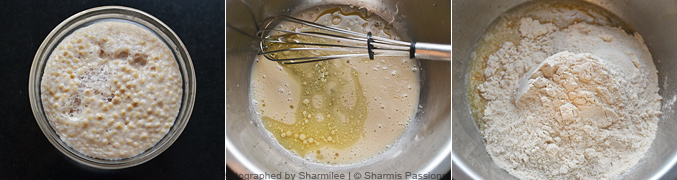
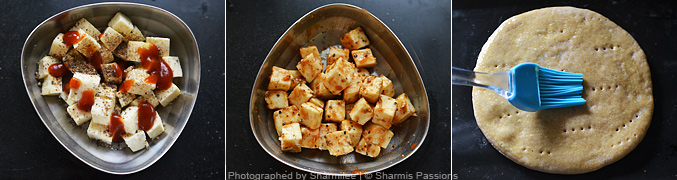
1.In ¼ cup warm water, add sugar and yeast set aside for 10mins.You will see the mixture frothing this ensure that your yeast is active. This test is only for active dry yeast, if you are using instant yeast then skip this step and proceed to step2.In a mixing bowl add the yeast solution, oil and salt whisk it well. Then add wheat flour and mix well. Add remaining ¼ cup water.
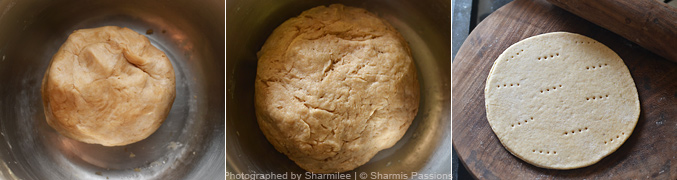
2.Mix well and knead it to form a smooth pliable dough. Keep it in a warm place undisturbed for 2 hours. When u check after 2 hours, the dough would have been raised. Now punch it down incase for any air bubbles. I divided the dough to make 2 small pizzas. Roll the dough to a thin base and cut it out with a lid to get perfect circles. Prick the base with fork to make sure of even cooking and to avoid puffing up.
3.Preheat the oven for 150 degree Celsius for 10 minutes. Add tomato sauce and freshly crushed pepper, oregano and mix well, Set aside. Grease a baking tray with little oil and sprinkle little flour. Transfer the rolled pizzas to the baking tray, and bake in preheated oven for 7-9 minutes. Once the pizza base is ready brush it with milk. Alternatively, If you want to bake both the base and topping together then at this stage add the topping and bake at 200 deg C for 15-20 minutes.
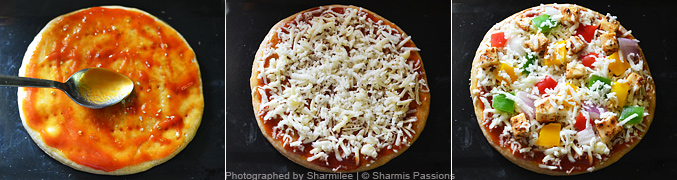
4.Spread pasta sauce on the pizza base. First add half of grated cheese then arrange the toppings - I've used onion, capsicum and paneer. Then add remaining grated cheese. While you arrange the toppings, preheat oven at 200 deg C for 10 minutes.
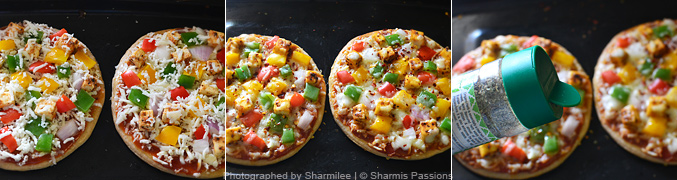
5.Once both the pizzas are ready, bake in preheated oven for 5 minutes until cheese melts and the base turns golden brown at the edges. After removing from oven add oregano, chili flakes cut into wedges and enjoy!
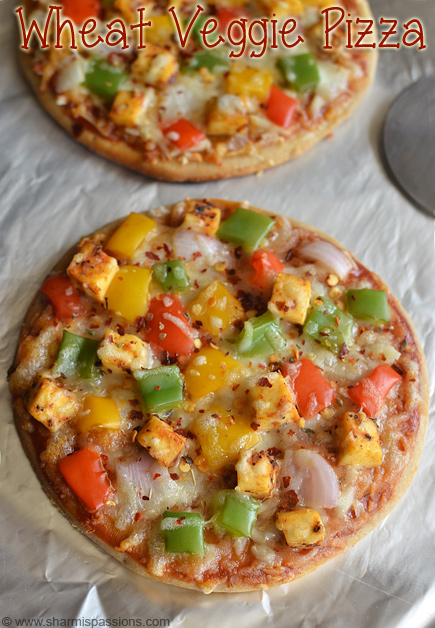
Yummy Cheesy Paneer ready to eat. Are you ready?! Now you have no excuses, come on put on your aprons and start baking. Serve hot!

Expert Tips
- Always check the yeast mixture before using, if it doesn't foam, it's not active.
- Dough should be soft not too sticky or too hard.
- Use a fork and prick the base before baking, this helps it cook evenly also does not let the base puff up.
- You can half-bake the base first and then bake again after adding toppings.
- Use parchment paper or foil on tray to avoid sticking.
- Use good quality mozzarella for best melt and cheesy pull.
- If you want crispier edges, brush the sides of the crust with olive oil before baking.
- You can lightly fry the paneer before using it for extra flavor.
- The texture of the pizza depends a lot on how you knead and rest the dough, so give it the time it needs to rise.
- The thumb rule : If you are baking just the base then its 150 deg C, if you are baking both base and topping it should be 200 deg C for 15-20mins.
- You can make variations for topping like soya, paneer, corn etc.
- You can use the same recipe for white base too, but adjust water quantity alone as white flour may take a little less than wheat flour.
- The resting time totally depends on the type of yeast you are using.
- If you are using instant yeast no need to proof it, add it along with water and just mix it.
- As my oven tray is small, I always divide the dough into 2 or 3 and make pizzas.
Serving & Storage
Serve Paneer Pizza hot as soon as it comes out of the oven for best texture and experience. It's best enjoyed immediately.
Leftovers can be stored in an airtight container in the refrigerator for up to a day. Reheat in a preheated oven or tawa for a few minutes until warm and the cheese melts.
FAQS
1. Can I use all-purpose flour instead of wheat flour?
Yes, you can use maida for the same recipe. Adjust water accordingly.
2. Is it necessary to proof yeast?
Yes, if you are using active dry yeast, and you can directly mix instant yeast to the flour.
3. Can I skip paneer or replace it?
Yes, you can use any vegetable alternative like tofu, mushrooms, corn, etc.
4. Is it okay to bake both base and toppings together?
Yes, just bake at 200°C for 15-20 minutes until edges turn golden.
5. Can I make this without an oven?
Yes, you can use a thick-bottomed tawa or pan with a lid and cook the base on a tawa first and then add sauce, toppings and cover and cook until cheese melts.
6. What cheese is best for homemade pizza?
Mozzarella works best for melt and stretch. You can also mix it with processed cheese for extra richness.
If you have any more questions about this Paneer Pizza Recipe do mail me at sharmispassions@gmail.com. In addition, follow me on Instagram, Facebook, Pinterest ,Youtube and Twitter .
Tried this Paneer Pizza Recipe? Do let me know how you liked it. Also tag us on Instagram @sharmispassions and hash tag it on #sharmispassions.
📖 Recipe Card

Paneer Pizza Recipe
Ingredients
For the pizza base:
- 1 and ¼ cups wheat flour
- 1 teaspoon active dry roast
- ¼ + ¼ cup water
- 1 teaspoon sugar
- ½ teaspoon salt
- 1 and ½ tablespoon olive oil
For the topping:
- ¼ cup paneer
- ¼ teaspoon black pepper powder
- 1 teaspoon tomato sauce
- ¾ cup mozarella cheese
- ¼ teaspoon oregano
- ½ cup capsicum cubed
- 2 tablespoon pizza sauce
- ½ cup big onion cubed
For garnish:
- oregano as required
- chilli flakes as needed
Instructions
- In ¼ cup warm water, add sugar and yeast set aside for 10mins. You will see the mixture frothing this ensure that your yeast is active. This test is only for active dry yeast, if you are using instant yeast then skip this step and proceed to next step.
- In a mixing bowl add the yeast solution, oil and salt whisk it well.
- Then add wheat flour and mix well. Add remaining ¼ cup water.
- Mix well and knead it to form a smooth pilable dough.
- Keep it in a warm place undisturbed for 2 hrs. When u check after 2 hrs, the dough would have been raised. Now punch it down incase for any air bubbles.
- I divided the dough to make 2 small pizzas. Roll the dough to a thin base and cut it out with a lid to get perfect circles. Prick the base with fork to make sure of even cooking and to avoid puffing up.
- Preheat the oven for 150 degree Celsius for 10 mins.
- Add tomato sauce and freshly crushed pepper,oregano and mix well, Set aside.
- Grease a baking tray with little oil and sprinkle little flour.
- Transfer the rolled pizzas to the baking tray, and bake in preheated oven for 7-9mins.
- Once the pizza base is ready brush it with milk. Alternatively,If you want to bake both the base and topping together then at this stage add the topping and bake at 200 deg C for 15-20 mins.
- Spread pastaa sauce on the pizza base.
- First add half of grated cheese then arrange the toppings - I've used onion, capsicum and paneer.
- Then add remaining grated cheese.While you arrange the toppings, preheat oven at 200 deg C for 10mins.
- Once both the pizzas are ready, bake in preheated oven for 5-mins until cheese melts and the base turns golden brown at the edges. After removing from oven add oregano, chilli flakes cut into wedges and enjoy!
- Serve Veg Pizza hot always!!
Notes
- Always check the yeast mixture before using, if it doesn't foam, it's not active.
- Dough should be soft not too sticky or too hard.
- Use a fork and prick the base before baking, this helps it cook evenly also does not let the base puff up.
- You can half-bake the base first and then bake again after adding toppings.
- Use parchment paper or foil on tray to avoid sticking.
- Use good quality mozzarella for best melt and cheesy pull.
- If you want crispier edges, brush the sides of the crust with olive oil before baking.
- You can lightly fry the paneer before using it for extra flavor.
- The texture of the pizza depends a lot on how you knead and rest the dough, so give it the time it needs to rise.
- The thumb rule : If you are baking just the base then its 150 deg C, if you are baking both base and topping it should be 200 deg C for 15-20mins.
- You can make variations for topping like soya, paneer, corn etc.
- You can use the same recipe for white base too, but adjust water quantity alone as white flour may take a little less than wheat flour.
- The resting time totally depends on the type of yeast you are using.
- If you are using instant yeast no need to proof it, add it along with water and just mix it.
- As my oven tray is small, I always divide the dough into 2 or 3 and make pizzas.


Sheeba's World
Can you post mittus snack box, lunch box n water-bottle, school bag pics ??... Eager to see mittus school items..
SHARMILEE J
Sure will do it in future 🙂
Mai
Just what i was looking for! Will try asap! Thank u!!
Uma Shankar
It looks so good!
AparnaRajeshkumar
so mittu has grown up nicely and she is pulling u back 😀 daughter and mother conversation are always interesting irrespective of age.I also love paneer pizza, with spicy version, lovely clicks
Supriya Nair
Looks so yummy. Very healthy too...
Anu Kavya
looks yummy and colourful. Should make a try surely !
Pragya Shukla
i should use convection mode or microwave mode....
Arjunan Akilandeswari
Yummy pizza...
Mullai Madavan
Yummy & Colorful pizza!
Sangeetha M
super yummy and tempting pizza...looks so colorful and inviting!
Meena srinivas
Thank you Sharmi for such a nice wheat pizza
Meena srinivas
Hi 5, I'm also having the same feelings like you, when my daughter's school reopened. I need a small sorry big help from you. I need some different recipes of olden days (my school days) snacks.... if possible can u try and give me. Kamarcut, Thenmittai, Verkadalai Uurundai, Verkadalai podi Burfi, Idicha nellikai podi. When I was sharing my school day memories with my daughter, she asked about all the snacks we had those days. I told her, she wanted to taste all of them, I tried my level best, I was able to get only very few items like Ilandavadai, Uppu Nellikkai, Kutti nellikkai,,Cheenipuliyankai(white and pink one-like U shape), normal kadalai uurundai, Orange mittai only. Can you help me ?
SHARMILEE J
Oh wow thank you so much for reminding all these....I will try to post them when I get hold of the recipes, will have to hunt for it but sure worth it 🙂
Deepa Viji
That looks so colorful!!!
Ramya
Sharmi,
Can you make a weekly snack and lunch plan for mittu and post it? So that we could also use it 🙂
SHARMILEE J
Ahh...will surely try
Sowmya Srinivasan
Hi. Can I make the base and cook it and keep aside for later use??
SHARMILEE J
Yes you can store it for a day
Gayathri NG
Healthy version pizza, looks so delicious treat for eyes...
traditionallymodernfood
Cheese pizza looks delicious.. Wheat crust has come out very well. Can v use tofu instead of paneer?
SHARMILEE J
Yes you can use tofu...
Instimg
Thank you for sharing the recipe!! Gonna try this pizza for my vegan days.