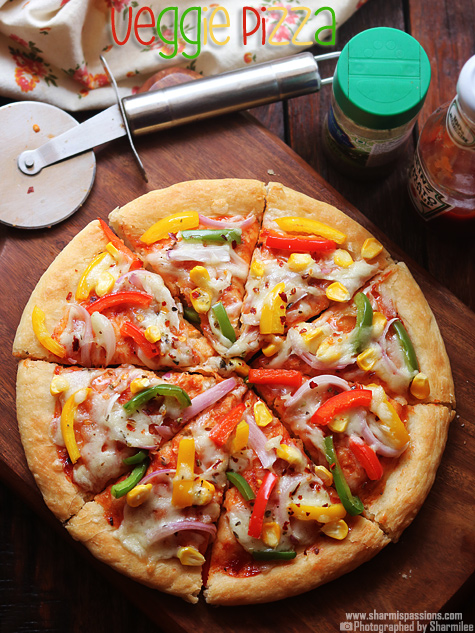
Veg Pizza Recipe - Learn to make perfect homemade veggie pizza, easy to make comes out perfect every time. This is a tried and tested recipe, yields the best veg pizza just like in restaurants. Here I have used onion, capsicum, sweet corn in this pizza, you can use any of your favorite toppings like paneer, mushroom, olives ,broccoli and the variations are endless.
Have been making homemade pizza for the past 10 years now. Every time I get a lot of praises for my pizza from friends and family so wanted to post this recipe here. I have tried many variations of this recipe and it works every single time. I have tried half and half with wheat flour and completely with whole grain flour too and the end result is just too good.
Jump to:
About Veggie Pizza
This Veg Pizza recipe is my go to recipe as I have made it so many times with perfect results. This Veggie Pizza Recipe yields best quality crust with cheesy pull perfect just like in restaurants so do try and enjoy!
The best pizzas are made in hot wood fired oven using a pizza stone. Our ovens cannot provide the same results but still pizza tastes great. I am sure you will not look back to order pizza again once you make them at home.
You can have the liberty to customize it according to your liking. The crust, the topping everything can be made according to your choice. Isn't that great?! This recipe is food proof that even beginners can try and enjoy!
To have a goey cheese Instead of baking along with topping for the entire 20 minutes ,first baked the base alone for 12 minutes at 200 DEG c, then arranged the topping with cheese and baked again at 210 DEG C for 8 minutes...there u get your perfect pizza!!?
I love pizza...who doesn't?! I was postponing this veg pizza recipe just for the reason that I had to write more. Also I wanted to compile all the pics with stepwise, and the variations.
With no doubt this recipe is a keeper but I made adjustments here and there each time and finally found the recipe for perfect pizza, So no more pizzas from restaurants. I have tried 2 versions one the normal one which I have posted here and the other one low fat whole wheat pizza.
Similar Recipes
Veggie Pizza Ingredients
- Flour - Use all purpose flour or maida. You can even try replacing half of flour with wheat flour for a healthy pizza.
- Yeast - I have used active dry yeast which works perfect. Bloom yeast separately to check first if it is active then proceed if you are not sure of the activeness.
- Sugar - Sugar adds a balance in taste also helps yeast to bloom.
- Milk - Milk and water is added to make the pizza dough.
- Pizza sauce - You can store homemade pizza sauce or use store bought pizza sauce.
- Topping - I have used onion, capsicum, corn and cheese.
- Cheese - Use good quality grated mozzarella cheese.
How to make Veg Pizza Step by Step
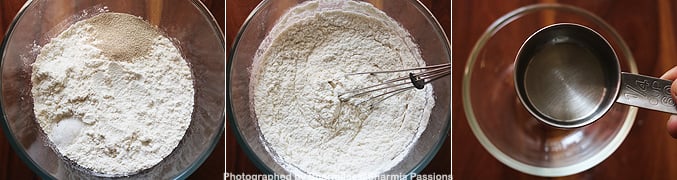
- To a mixing bowl - take flour(maida), add yeast and salt to it.
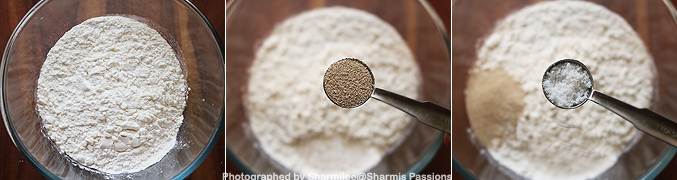
2. Mix well, Set aside. To another mixing bowl, take luke warm water.
3.Add milk, oil and sugar.
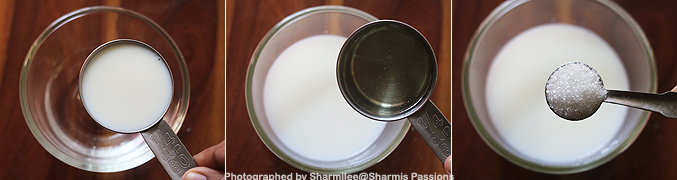
4.Mix well until sugar dissolves. Now add this mixture to flour.
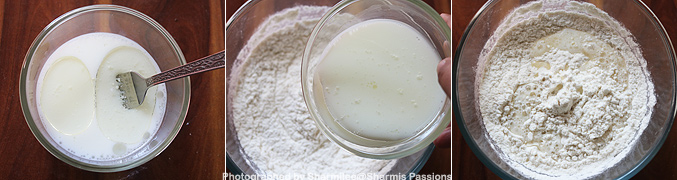
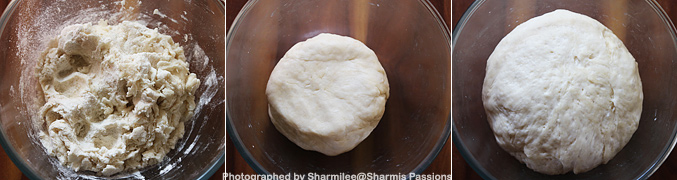
5.Bring together. Knead for at least 5 minutes to a smooth dough. Cling wrap and set aside for 1 hour at least or until the dough doubles. When you check after an hour, the dough would have been raised well.
6.Brush the pizza baking tray with oil, sprinkle flour and keep it ready. Now punch the dough down incase for any air bubbles and then keep aside in a warm place. Roll the dough a little thick.
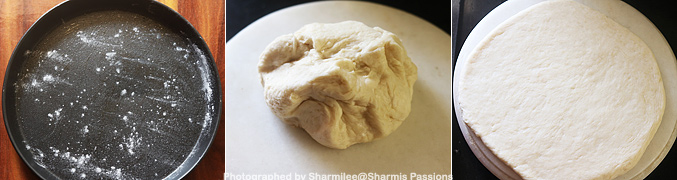
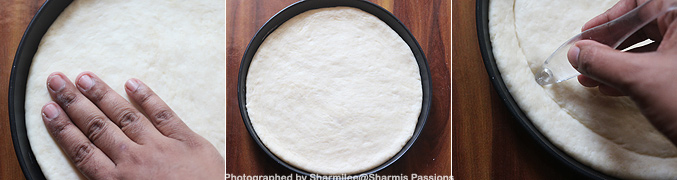
7.Transfer it to the baking tray and stretch it a little so that it forms a neat circle. Press it well so that its even. Press the edges with a back of a spoon to form a rim like effect. Preheat the oven at 200 DEG C for 10 minutes.
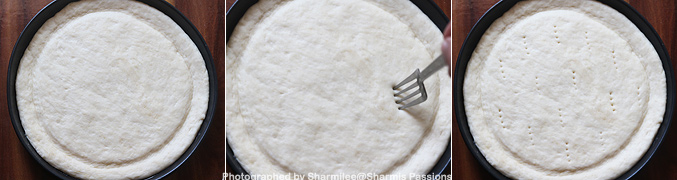
8.Now using a fork prick in the center for even cooking.
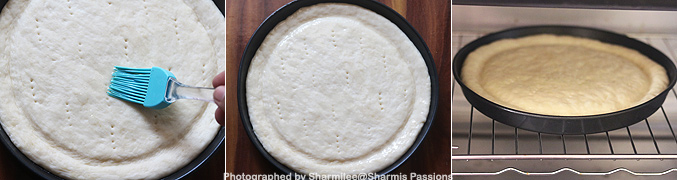
9.Brush well with oil/milk for even browning. Bake the base for 12 minutes or until the edges and center turn golden.
10.Spread the pizza sauce, I used the readymade pizza sauce. First add half of grated cheese.
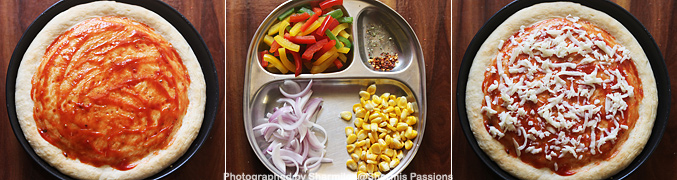
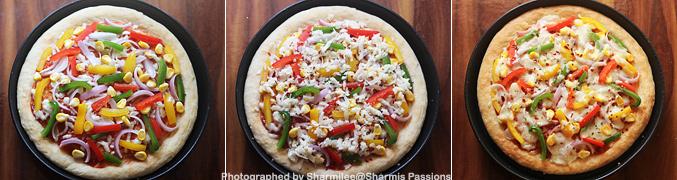
11.Then arrange the toppings - I've used onion, sweet corn, capsicum. Then add remaining grated cheese, sprinkle oregano and chili flakes. Bake it again at 210 DEG C for 8-10 minutes or until the pizza is golden brown and cheese melts.
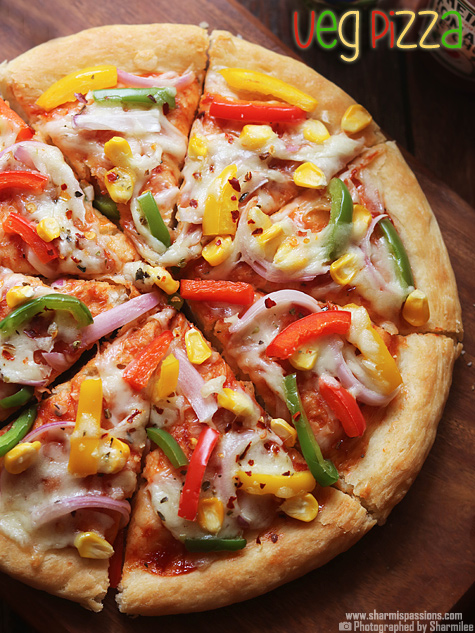
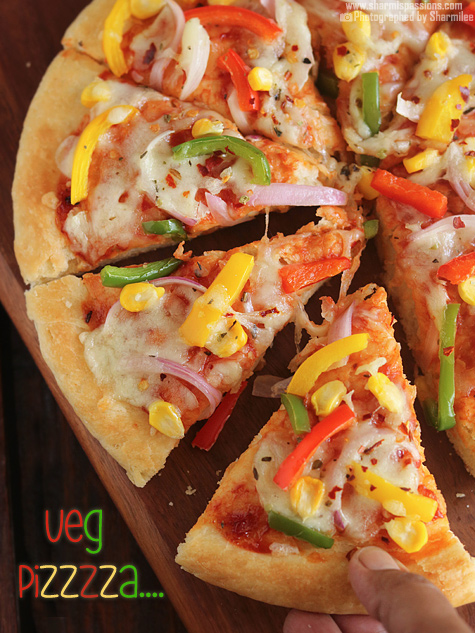
Cut the pizzas with pizza cutter/knife, make wedges and enjoy hot and yummy pizza! Serve hot! And its pizza time now , now lets dig in.
Expert Tips
- Baking - You can bake the pizza along with topping and cheese for 20 minutes too but since I want a golden crust and goey cheese I do it this way.If you bake it along with topping, you will not get the golden crust as in restaurants, also if you bake more for getting the crust the toppings get overbaked so I use this method of baking.
- Dough - The dough shouldn't be sticky, if so add in a little more flour and knead again until it is less sticky.
- Flour - I have used white flour here, you can replace with 50% wheat flour too.
- Preheating - After the base is baked, you need not preheat again. Just arrange the topping and bake it.
- Yeast - I used instant yeast, so added it directly to the flour. If you are using active dry yeast(measurement in ingredients list), then proof it by adding it to the milk water mixture, if it bubbles up well then yeast is active ,you can proceed.
Serving & Storage
Veggie Pizza is best when served hot! If you want to make pizza for party or get together prepare the topping and keep it ready then make the dough ready. Bake and serve hot.
If you have any more questions about this Pizza Recipe do mail me at sharmispassions@gmail.com. In addition, follow me on Instagram, Facebook, Pinterest ,Youtube and Twitter .
Tried this Veggie Pizza Recipe? Do let me know how you liked it. Also tag us on Instagram @sharmispassions and hash tag it on #sharmispassions.
📖 Recipe Card

Veggie Pizza Recipe | Homemade Veg Pizza
Ingredients
For the base:
- 1 and ½ cups flour
- 1 teaspoon instant yeast or (1 tablespoon active dry yeast)
- ¼ cup milk
- ¼ cup water
- ⅛ cup oil
- 1 teaspoon sugar
- salt to taste
For the topping:
- 1 tablespoon pizza sauce
- 2 tablespoon onion chopped lengthwise
- 2 tablespoon capsicum in each color
- 2 tablespoon sweet corn kernels cooked
- ½ cup mozzarella cheese
- ¼ teaspoon oregano
- ¼ teaspoon chili flakes
Instructions
Pizza Base
- To a mixing bowl - take flour(maida), add yeast and salt to it.
- Mix well, Set aside. To another mixing bowl, take luke warm water.
- Add milk, oil and sugar.
- Mix well until sugar dissolves. Now add this mixture to flour.
- Bring together. Knead for at least 5 minutes to a smooth dough. Cling wrap and set aside for 1 hour at least or until the dough doubles. When you check after an hour, the dough would have been raised well.
- Brush the pizza baking tray with oil, sprinkle flour and keep it ready. Now punch the dough down incase for any air bubbles and then keep aside in a warm place. Roll the dough a little thick.
- Transfer it to the baking tray and stretch it a little so that it forms a neat circle. Press it well so that its even. Press the edges with a back of a spoon to form a rim like effect. Preheat the oven at 200 DEG C for 10 minutes.
- Now using a fork prick in the center for even cooking.
- Brush well with oil/milk for even browning. Bake the base for 12 minutes or until the edges and center turn golden.
Pizza Topping
- Spread the pizza sauce, I used the readymade pizza sauce. First add half of grated cheese.
- Then arrange the toppings - I've used onion, sweet corn, capsicum. Then add remaining grated cheese, sprinkle oregano and chili flakes. Bake it again at 210 DEG C for 8-10 minutes or until the pizza is golden brown and cheese melts.
- Cut the pizzas with pizza cutter/knife, make wedges and enjoy hot and yummy pizza! Serve hot! And its pizza time now , now lets dig in.
Notes
- Baking - You can bake the pizza along with topping and cheese for 20 minutes too but since I want a golden crust and goey cheese I do it this way.If you bake it along with topping, you will not get the golden crust as in restaurants, also if you bake more for getting the crust the toppings get overbaked so I use this method of baking.
- Dough - The dough shouldn't be sticky, if so add in a little more flour and knead again until it is less sticky.
- Flour - I have used white flour here, you can replace with 50% wheat flour too.
- Preheating - After the base is baked, you need not preheat again. Just arrange the topping and bake it.
- Yeast - I used instant yeast, so added it directly to the flour. If you are using active dry yeast(measurement in ingredients list), then proof it by adding it to the milk water mixture, if it bubbles up well then yeast is active ,you can proceed.


Paaka Shaale
The pizza looks super good sharmi. I'm book marking this 🙂
Arundhuti
These pizzas look superb Sharmilee!!! Great strp-by-step explanations. They look so tempting. Your lovely pics are tempting me more....:)
Sayantani
superb Pizza Sharmilee. I tried making the base but my yeast failed me. which brand did you use by the way? love the low fat version more.
Sharmilee! :)
@Sayantani : There are several brands but I finally settled down in a brand called 'Bake King' Active Dry Yeast
RAKS KITCHEN
Wow,spicy looking pizza,lovely stepwise pictures as well!Kalakku !! I love the low fat version picture more 🙂
jeyashrisuresh
pizza with panner topping i am craving for some. here in pizza hut for vegetarians we get only one choice.
both r looking very yum ,want to have a bite
Premalatha Aravindhan
Yummy pizza,love the toppings...very tempting pics.
Anonymous
Sharmi, the maida pizza looks perfect... stepwise is to be really appreciated!!!... From the pics, I guess the wheat pizza is dense and not fluffy enough... Does thincrust turn out well with wheat?...Have u tried a 50-50 wheat-maida?... let me know ur exper...would like to try it...
Foodie Ann
Pizza looks really good....:)
Kairali sisters
Sharmi..Simply awesome post dear.the pizza looks very very tempting and loved the step pictures, i was planning to do so for a lonng time, but never happened really...GREAT JOB!!!!
Sharmilee! :)
@Anonymous : Thanks for ur feedback. I have tried thin crust with low fat version....Infact the low fat one showed in the above pic is slightly thinner than the usual ones only, now have updated too. And thats the reason its shown dense...the pizza doesnt puff up much so there is no difference whether u use wheat/maida.The only difference maida gives is the taste and melt in the mouth softness.
No havent tried a 50-50 version but that will be more like the maida version I guess...Hope this helps!
Sujana
Both the pizzas look very tempting, will definitely try them in the coming weeks and let you know how they turned out...
Beautiful clicks, Sharmi!!!
Sowmya
The pizza looks so inviting! And its step-by-step evolution is fantastic 🙂
Shalini
hi sharmi, very tempting pizzas. lovely. i liked all the versions. it has come out so well. awesome clicks:)
Priya
Am speechless and drooling over that beautiful looking paneer pizza..very tempting..
GEETHA ACHAL
Pizza looks so perfect...Looks so tempting...
Suja Sugathan
Beautiful tempting pizza ..loved the step step explanation and pics..nice post.
Torviewtoronto
delicious love home made pizza
Pavithra
Awesome awesome awesome... wonderful pictures with tempting pizzas.. Home made is always best.
nimi
Hi Sharmi, lovely Pizza... the pics are very good.
Really appreciate the stepwise photographs... very informative... and the lowfat version is good enough !
Yummy Team
wow!! Perfect and tempting pizza..Loved the step by step pictures, Sharmilee..Great job!!
Anonymous
Thanks for the clari... I'll try both versions and 50-50 aswell... 🙂
Prathibha
Lovely step wise pics sharmi...all of them look super delicious tempting...
indianspicemagic
Good clicks.Yummy pizza .Very colourful and tempting.
Chitra
Nice explanation. Lovely pizzas.must try the low fat version:)
An Open Book
amazing...i love the paneer version
chaitrali pathak
looks super delicious and toooo tempting
swapna
super good and delicious pizza...love the step by step pics!!
Sarah Naveen
Awesome...beautiful clicks..super delicious.
Ananda Rajashekar
ooooo home made ones are the best the look stunning!
Priya (Yallapantula) Mitharwal
Sharmi, I bookmarked and surely trying it out 🙂
Mahimaa's kitchen
onion capsicum pizza looks delicious..love the pics... sapdnum pola iruke suda suda.
Mahi
Pizza's look lovely! Happy to follow you Sharmi!
Gulmohar
Great pic description...lovely clicks Sharmi...Home made is the best 🙂
Sreelekha Sumesh
Wow!Amazing!Pizza looks perfect and so yummy.Well done Sharmi.
Sanjeeta kk
Love both the versions of pizza, Sharmi. Lovely presentation. Makes a great post to refer in future. Best wishes, take care.
Lavi
was waiting for the post for long time. Superb and Usefull Presentation with step wise pictures.
definetly i have to try your way..
Alexia
Great looking dish! Make me hungry!
Sanchita Karmakar
never tried the paneer version but it looks so tempting..well done !!
Kurinji
Awesome piza!
Red Chillies
Kudos to you for making this pizza Sharmi and posting it with all step wise pictures. We had this pizza while we were in India and loved the flavor of it.
Anytime (the lazy me) will ever feel like making it at home, I know where to look :-))
GeethuSathiyaN
Hi sharmi thanks for u comments...pizza looks so yummy...i feel so bad that don hav a oven at home...very gud try...
Raji
Hi, Tried this recipe last night and it came out awesome. It was damn easy that was a breeze to prepare. My hubby said home made pizza is 150% better than restaurant pizza in both taste and health-wise. Kudos to you!
Sharmilee! :)
@Raji : Wow ,thats great to hear...You've made my sunday even more special 🙂 Thanks for trying and letting me know!
Sheeja Krishnan
Hi, Tried the recipelast night and was tasting superb!!! Thanks for the recipe! But I feel the toppings are sliding out when I serve them !! What would have gone wrong? I used the law fat version from your recipe.Is it that the pizza sauce was in excess?? Thanks
Sharmilee! :)
@Sheeja : Thanks for trying and letting me know, glad that u liked it 🙂 You need to press the topping slightly(half shown outside) as I've mentioned, then the toppings will not slide out. Hope this helps!
nitya
i was wondering if i can use wheat flour for the same???
Sharmilee! :)
@Nithya : Please find the low fat version at the bottom there I've given the measurements with wheat flour...but making whole wheat pizza purely with wheat flour didnt work out for me...as the crust/base was hard...Hope this helps!
Kiran Kumar
Thanks Sharmilee. This is the first time, i had prepared Pizza with your detailed steps.Thanks a lot. My Wife really liked the mouth watering pizza that i'd made
Anonymous
superb
Devi
Hi Sharmi,i'm a pizza lover so i'm very happy to see this. I want to try this now itself, but pls clarify me about baking pizza pan vessel. Is it possible without aluminium foil?
Sharmilee! :)
Aluminium foil is not must, just skip it and grease the pan with little oil and bake the pizza
Devi
Thanks pa...
Devi
what about the pan? aluminium round cake baking pan is ok?
Sharmilee! :)
I used my collecting try which is aluminum but baking pan should also be fine
sowmya
I just tried these yesterday.. the crust was soo super crispy and soft, tender inside...perfect crust!! Thanks Sharmi!!
Indu
Hi Sharmi,tried this pizza yesterday...came out very well and my hubby was full of praises. This is the 1st time I baked a pizza and for the 1st time it really came out well. Decided to bake it again with more perfection. My hubby said, it is equivalent to the Pizza hut pizza and even more....Music to my ears 🙂 ...Thanks for the wonderful recipe and the step by step explaination with photos 🙂
chetna
very nice pics and pizza to..willing to try cookies recopies given by u..will surely let u knw the out come..thank u very much ma'm to share all this with us..its realy very helpful
Unknown
hey cool yaa I mean I cudn't find sch an organised recipe at da Tarla's or evn Sanjeev's site..!! M 15 n more lyk an amature so lookin forward fr sm mr interesting dishes.. Btw Hats off to ur patience 😀
arthi
Hi sharmi. I too make pizzas regularly for my nephew and he loves it. Just a few suggestions which I found useful. Suppose ter is no time to marinate the paneer we can add a pinch of salt,a squeeze of lemon,and a spoon of tandoori chicken masala to the chopped paneer mix well and use it as a topping(the lemon juice is just to make th tandoori masala stick to the paneer). Also adding cheese to th base. Then laying th toppings on the cheese is good cos when the cheese melts the toppings sink in and become firmly embedded into the base and does not come off easily when u bite into th pizza.
Nimisha
hello Sharmilee,
can we bake the raw dough along with toppings?i guess somtimes the dough inbetween will not cook...did u face that problem?or else first we have to bake the pizza base for sometime and then add the toppings and then again bake it...?
thanks,
Sharmilee! :)
@Nimisha : No I havent faced such an issue...may be if you feel so you can bake the base first then top it up and then bake till cheese melts...Hope this helps!
carine
I tried this pizza today and my family loved it. Thank you 🙂
prettylife
I tried this last night and was just perfect. Thanks for the great recipe and step by step pics
prettylife
I made this pizza last night and it turned out great. Thanks for the awesome recipe and pics!
sheetal
just perfect!
vaisakh
is it in microwave or conventional oven?? this is my first trial on pizza. pls help
Sharmilee! :)
@Vaisakh : I tried in my OTG but the orginal recipe is tried in microwave only so anything will be ok
Archana
Hi Sharmi, Can you please tell me how many servings of pizza we can get from this measurement?
Sharmilee! :)
@Archana : You can either make 2 thin based pizzas or a large pizza
Dhivya Sekhar
Hi Sharmi,
Tried this pizza now.... Came out very well... Thanks for the step by step pictures..... Crust came out so well so that no one believed that its a homemade base...... Good and great recipe!!!
sun
wow !!!!! Looks delicious and too tempting !!!!!!!!!
Please can you tell in which rack the shop bought pizza base has to be kept in the oven. (middle rack or the bottom rack) ?
Preheating time ....Cooking time ...please can you mention that too....
Sharmilee! :)
I usually keep in middle rack...preheat it for 10mins
Rimpy Bhatia
Hi i made a veg pizza with ready pizza bread. But after 15 mins of 250 decrees grill in morphy richard OTG my pizza was crisp from up but base was not brown. Why ?
Sharmilee! :)
Oh not really sure for readymade pizza base dont think you need to keep at 250 deg....I usually bake at 200 deg C for 10mins when I use readymade pizza base with last 2-3mins in grill mode this way browning and cooking will be fine.
vishakhabothe
Hi Sharmilee
Please inform me which brand of active Dry Yeast to be used & it is possible to make pizza sauce at home
Sharmilee! :)
I used bakers brand but now I got pack of yeast which is from US from my friend so using it....the brand name is fleischmann
Zim
Great recipe Sharmilee 😀 Though I differ on the Pizza Hut issue 😉 I find their crust hard and not so good. For me, pizzas will always be from Dominos! 😀 But, nothing beats homemade goodies 😀
Uma Ramesh
hi sharmilee,
Awesome.wonderful post.what is the preheating time.u mentioned @210degree but for how long.thx.Uma.
SHARMILEE J
Preheating time always depends on ur oven, please check ur manual for it....I always preheat for 10mins
Ani
Hi ur pizza Luis gr8... I don't have an oven so I usually do it in a cooker.... Hey can u suggest me an oven that I can buy.... I am very much interested in baking... I can't make out if I have 2 go for an OTG or microwave.... They say cakes don't come out well in a microwave ovens.. I want an oven that is an all rounder.. Which one do u use... Kindly suggest....
SHARMILEE J
Reg your query : I am really not sure of the outcome in microwaves as I have used only OTG.....You can check out my oven details in the 'my oven post'.
artha M
Hi I tried dis one.It came out really nice...My son loved it
artha M
Hi,I tried dis one & it was vry nice.My son lovd it.Tnk U
Ramya Vijay
Hi sharmilee.. Your blog is sooper dooper.. 🙂 It is a varaprasadham for newly married 🙂 I have a doubt .. Recently I bought a kenstar oven with Microwave,Grill&Convection mode. For this recipe do I need to use any combination mode? I have options like 1)Microwave+Grill 2)Microwave+Convection 3) Microwave+Convection+Grill . Do i need to preheat a oven before keeping the base inside?
SHARMILEE J
Yes you need to preheat the oven...and reg the mode I am not really sure as I use OTG.Guess Microwave + Convection mode will help...Please refer the manual
Udaya Kumar
pls let me know the baking time and temperature dr
SHARMILEE J
Use the same preheating temperature for baking also.
Kirti Rao
This will taste heavenly with oregano seasoning.
Anjali
Thank you soooooooooooooooooooooo much for the recipe. I tried ti out and it turned out great
sucheta dalvi
Is it not possible if I buy a pizza base and follow the remaining steps and make a similar pizza
SHARMILEE J
Yes you can but keep a check on the timing alone....
sri
Hey Sharmilee, Is there any alternative for yeast?
SHARMILEE J
No...
Recipes from pratibha kitchen
Looking yummy. Which brand of yeast have You used
Binal Desai
hi,
i tried y'day taste great, cooked well, only problem found was it become loose and soggy from middle, i put on baking tray with aluminium foil and all foil stick to pizza from bottom, what i have done wrong, followed all steps perfect, can u help.
thanks
SHARMILEE J
I use bakers brand yeast...
Suguna
Hi Sharmi! Could you please tell me where can I get these brand yeast? I'm in Namakkal. Unfortunately I couldn't get it. Thank you.
And you are doing a wonderful job. I'm nothing in cooking without your website and Raks. I've been searching the oven details, and baking things since yesterday. I've ordered an OTG (Morphy Richards) today. I couldn't get online delivery for Marvelo 35lr to my pincode. So Went with yours old brand. I'm ordering things one by one by your great posts. Such a awesome job you are doing! Thanks a lot, Sharmmi.
Sharmilee J
Aww thats so sweet...You made my day.Thank you much!
Geethu Sathiyan
Sharmi,i don hav olive oil,shall i replace it with sunflower oil or butter?
SHARMILEE J
Yes you can use normal cooking oil....
Malar
Hi, I tried this pizza recipe today and used a whole wheat flour instead. It came out awesome. I am going to make this again and again..
Thank you for sharing the recipe!
Shwetha Aithala
Worked like a charm for me! 10 on 10. Thanks a ton for sharing this recipe
REVS CULINARY
Hi Sharmilee,
Your pizza recipe is very yummy and easy to follow. I tried and it gave me fantastic results. Thanks for sharing.
Thanks,
Rev
Shalini Mahesh
hi sharmi .. i tried this recipe for couple of times. First time it was huge hit at home... but second time the dough dint raised after an 2 hours.. even i tried continuing baking, but the base was uncooked after long time of baking too.What should have gone wrong with the dough, why it has failed to get double in size after 2 hours.
SHARMILEE J
Was the yeast active? If the yeast is inactive then the dough will not rise so while baking it will not get cooked properly.
Shalini Mahesh
i used an instant yeast.. Is that coz of hot water.. Is that it to be little warm or very hot while adding in to yeast ?
SHARMILEE J
Slightly warm....
radhika bhimani
Hi I just wanted to know ll instant yeast require one tablespoon...inAPF....
radhika bhimani
Hi just wanted to know that In APF do v require one tablespoon of instant yeast?
SHARMILEE J
You can add 1 tsp instant yeast and try...
Tamilarasi V
Hi Sharmi
Pizza is looking yummy... Have become fan of ur recipes... Can I make pizzas in microwave? If yes can I use flat glass bowl to make pizzas? Plz do reply... My niece is fond of pizzas...
SHARMILEE J
If you have microwave convection mode then you can.....You can try
reema
Hi Sharmi!
Can u please help on the temp range. I use a convection oven.. My son is a big fan of pizzas. Would like to add paneer toppings to it. Should I fry the paneer before tossing. I am a big fan of ur recipes.. Please help
SHARMILEE J
I am really not sure of convection oven as I have been using only OTG for baking, so ur manual is the best place to check....Check my paneer tikka pizza for paneer topping ideas
Unknown
I just bought a MR OTG and want to try this recipe. So you have used the aluminum tray for the pizza. And placed it in the middle rack. But am totally confused about the modes. Pre heating in which mode for 10 mins?? And baking in which mode for 15-20 mins? Please help me
Ananth P
Can you please help me. Preheat should be done in which mode? And the actual bake in which mode?? Am confused please
SHARMILEE J
Preheat in toast mode and baking in bake according to my OTG manual, it may vary from oven to oven
Ananth P
Thank you mam. Could you also help me which brand olive you use and which Oregano. Should we buy Oregano,badil,mixed herbs. Very confusing for pizza what we need. Could you please help
SHARMILEE J
I use Musa brand olive oil and Nilgiris brand Oregano.You can either use mixed herbs or oregano
Ananth P
Hello mam. Tried the pizza today. Taste was great but the base burnt badly. And the toppings were not cooked properly. I kept in lower wrack. Pls tell me what I did wrong.
SHARMILEE J
In that case you can bake the base separately and then arrange the toppings and bake for just 10mins...Check out my pizza base recipe for more detailed information
harini
hi sharmi made this pizza two days back.came out well.thanks for the detailed explanation.i am new to baking and to use yeast.but nothing stood in my way to make this pizza successfully.thank u once again.but i was little bit doubtful in proving the yeast even i referred urs.so if u can make a separate post or video for this ll be useful for beginners and who knows nothing about yeast.thanks in advance.
Khanita Bareera
how much degree should we bake it?
SHARMILEE J
Same as preheating temperature 210deg C
Khanita Bareera
If we cook in two or three batches should we preheat the all the time? or one time preheat will work for all the batches?
SHARMILEE J
If you are continuously baking then first time preheating is enough....
asha's blog
Pizza came out very well.thank u
Valarmathi
Hi ,we have just bought an oven. But the pizza is not coming properly. Can you kindly help mecto use which mode and how much centigrade and time too. I don't know which is the pizza mode. Mine otg is morphy richards 40 rc-ss. Can you kindly help me with pictures. Thank you in advance.
Sharmilee J
Please read your instruction manual thoroughlly before starting becos each oven is different.There is no pizza mode I use bake mode to bake cakes, cookies,bread and pizza.
Sana
Hi Didi,
I can make out that the recipe is a killer one. May I ask you few questions?
1) which size of baking tray you have used for this recipe? If you bought it online please let me know.
2) which Indian brand of mozeralla cheese do you recommend?
Thanks in advance.
Sharmilee J
I used a 8 inch circular tray
I used amul mozarella cheese
Rima
Hi, I don't have an oven but an Airfryer. I tried making wheat flour pizza base in Airfryer but it got burnt. Can you please guide me.
Sharmilee J
I am really not sure of airfryer as I havent used it at all
Div
Hi sharmila... love ur recipes.. I have tried pizza recipes in the past and all of them had a yeasty flavour/ smell in the pizza .. pls clarify if this recipe has a yeast flavour or smell after making the pizza ? Thanks 😀
Sharmilee J
It depends onthe yeast variety you use...try a different brand
Jyothi A
What is the size of the pan u used?
Sharmilee J
Its 6inches I think
Sana
I tried this recipe and it came out amazing. But I wish I had an oven which provides even heating. Other than that everything went well .
Recipes Spot
Looks so colorful and yummy. Very well explained.
Ridhisha
I am speechless this looks so delicious. Keep posting
Nimesh
Pizza is something we can’t live without. I love Pizza.
Bhargavi vidmahe
Hi sharmi,thnq for easy and detailed posts.planning
To prep pizza for kids bday party at home.
Can u please help me for an alternative tray to pizza
Tray as I don’t own one.also I own Morphy Richards otg
52lts.please let me know if both rods or bottom rod
To be selected while baking
Sharmilee J
I use both rods on...You can use the cookie tray that comes with the oven itself
Imsn
How many ml is yr one cup? Would like to try?
Sharmilee J
My 1 cup measures 250 ml
Amala
First of all thank u so much sharmi mam .I tried it today both Ur pizza sauce and veggie pizza which turned out to be awesome and Ur beautiful way of explanation was very helpful .keep posting.finally a lots of love to u as I got a lot of appreciation for this pizza which I owe to u