Ghee is one of the best natural flavour for food which tastes divine and is a part of Indian cuisine for many many years. Ghee is the yield of simmering butter in low heat after skimming impurities from the surface & discarding the milk solid residue that has settled to the bottom. How to make Ghee is explained in this recipe with step by step pictures and video.

Ghee is extensively used in Hindu religious rituals like homam, lighting deepam, etc. Ghee is also used as part of traditional ayurvedic medicine. Making ghee at home is recommended – be it for food, rituals or medicine. Let us see why and how.
About making ghee
Ghee can be made in multiple ways – from cream, butter and cream butter.
- From cream: Fresh cream or cultured cream is heated to produce caramelized flavoured ghee.
- From butter: Butter is simmered for about 15-20 minutes to produce aromatic, nutty flavoured ghee.
- From cream butter: Cream is curdled to form butter and then heated to produce tasty ghee.
The ideal method to make ghee at home is to make from butter. Homemade butter is preferred, else store bought butter can be used. It has a high smoke point which makes it perfect for cooking, stir frying and deep frying.
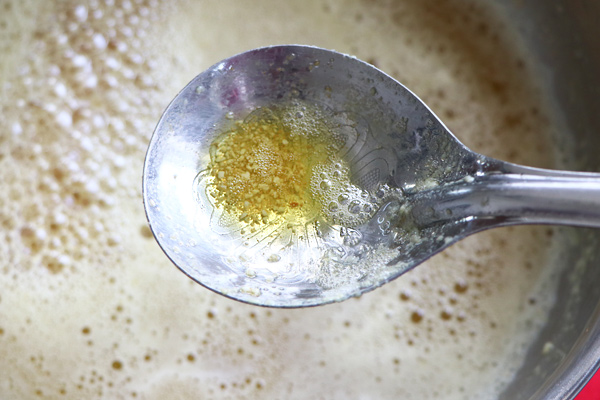
All that glitters is gold – Ghee – The Liquid Gold
When simmering the butter, the stage when it becomes like liquid gold (golden yellow) and when the milk solids have browned and settled at bottom it denotes that we have made the perfect flavoured, tasty, right nutty ghee. Switch off the gas and do not worry when it gets brown after cooling down!
Ghee – Lasts long – really long!
Another amazing thing about Ghee is that it lasts long – really long. Ghee has the longer shelf life next to honey! Ghee need not be refrigerated and it could last about a year though the fresh flavour fades with time. Ghee has to be stored in an air tight jar to retain the flavour & taste till the last drop. However it gets over in a month or so when we make ghee with 250 grams of butter because of its taste & flavour – everyone can vouch it!
Gheed food – What can I make with ghee?
- Topping : Over roti, bread, idli, dosa, paratha, upma and lot more items as topping
- Sweets : Mysurpa, Halwa, Kaju Katli, Laddu, Nankhatai, Malpua, Adhirasam, Pongal, Neiappam, and many more
- Ingredient : Jeera Rice, Biryani, Paneer Ghee Roast, Dal Tadka, Ghee Rice, Dal Kichdi,
- Fry : Toast, fry veggies, spices, condiments with ghee for flavorful tasty food.

Ghee Benefits as Medicine
- Very unlikely to catch cold, cough in winter as Ghee helps you keep warm from within.
- Good for the heart as Ghee is good fat.
- Aids Digestive system with healthy gut which reduces chances of ulcer & cancer.
- Helps to maintain hormonal balance especially in women.
- Decreases Glycemic Index when Ghee is applied on roti, idli, dosa or food drizzled with Ghee.
- Helps for a glowing skin & treat burns.
- Improves eyesight.
Ghee Benefits as Flavour
- Ghee enhances the taste of the food
- Ghee increases the appetite – A reason for adding ghee extensively in kids food
Ghee Benefits – Others
- Surprisingly Ghee is lactose free – Hence it is good for people who are diary intolerant
- Ghee is sattvic food
- Weight loss as Ghee burns the other fats in the body
- Ghee helps in cleansing the body of harmful & toxic elements
Ghee in English
Ghee is ghee in English – However for the benefit other nationalities – Ghee is a sort of clarified butter which is further simmered to get devoid of milk solids. Clarified butter is a stage of Ghee when milk/water is just evaporated to get liquid fat which will include milk solids.
Ghee Price
Ghee Price and Butter Price is more or less the same INR 450-550 / litre – Ironically store bought ghee is sometimes cheaper than store bought butter. I leave it to your wild guess why ghee should be cheaper than butter when ghee has to come from butter.
Making ghee is cheaper, tastier and flavourful when you get milk (full cream milk from milk vendor which is raw & not processed), collect the malai for about a week or 10 days, churning & separating butter and then simmering it to ghee!
The next best option is to get butter and make ghee. You can be assured that the ghee is ghee (pure in commercial terms & not mixed with vanaspati).

If you have any more questions about this Ghee Recipe do mail me at sharmispassions@gmail.com. In addition, follow me on Instagram, Facebook, Pinterest ,Youtube and Twitter .
Tried this Ghee Recipe ? Do let me know how you liked it. Also tag us on Instagram @sharmispassions and hash tag it on #sharmispassions.
📖 Recipe Card

How to make Ghee | Ghee Recipe
Ingredients
- 250 gms butter
- curry leaves or rock salt or drumstick leaves optional
Instructions
- To a kadai or thick bottomed kadai – add butter. I used 25- grams store bought butter this time. When I use store bought butter I use 250 grams and melt it which lasts for me for about 15-20 days. But mostly I use homemade butter made from collecting malai for about 15 days.
- Keep in low flame and let it melt slowly.
- Once completely melted it starts to bubbles up. Stir in between to avoid burning. It will be frothy.
- The froth slowly changes and milk solids starts to separate.
- Cook in low flame. You can see the color change from buttery frothy milky white to light golden.
- See the milk solids are separating. But the milk solids are still ivory in color. Keep stirring in between.
- It will bubble up and the milk solids go collect at the bottom. The top surface will look clearer.
- The milk solids are still light golden.
- Cook in low flame until the milk solids are golden in color. Check by stirring at the bottom. You should be very careful after this stage as it gets to brown / burn easily so be attentive and keep an eye.
- Now add few of fresh curry leaves or rock salt or a small sprig of moringa leaves for flavour. This step is purely optional but gives more shelf life with a great flavour.
- Cook for 1 more minute. Switch off.
- The milk solids are now fully caramelized and turns brown in color as shown below. Switch off at once.
- Immediately strain using a metal strainer. You can mix this with rice and have it or eat just the curry leaves alone tastes so good.
- Homemade ghee is ready. Cool down then store. I usually store it in a glass jar in bulk then take just enough ghee in a small container to place it in kitchen for daily use. Store the rest in a cool spot and use whenever needed. If adding to glass jar make sure it is heat resistant else cool down then store.
- Always use a clean dry spoon everytime you take ghee.
Video
Notes
- You can use rock salt or curry leaves or drumstick leaves dipped in buttermilk and add it at the last stage for residue to completely bottom out.
- The residue can be mixed with rice and had, it will be very tasty. You can even add roasted wheat flour with nuts to make atta ladoos.
- I took the butter straight from the fridge so cooked in low flame else it will start burning.
- If ghee is not cooked properly, it will give raw flavour so be patient and cook in low flame.
- Adding drumstick leaves or curry leaves makes the ghee more flavourful and will help stay so for a longer time.
- Do the whole process in low or medium low flame to avoid burning.
- Always use a clean, dry spoon to take ghee to prevent contaminating and to retain flavour.
How to make ghee
Melting butter
1.To a kadai or thick bottomed kadai – add butter. I used 250 gms store bought butter this time. When I use storebought butter I buy 250 gms, melt it which lasts me for about 15-20 days. But mostly I use homemade butter made from collecting malai for about 15 days.

2.Keep in low flame and let it melt slowly.

3.Once completely melted it starts to bubbles up. Stir in between to avoid burning. It will be frothy.

Cooking in low flame
4. The froth slowly changes and milk solids starts to seperate.

5.Cook in low flame. You can see the color change from buttery frothy milky white to light golden.

6.See the milk solids are seperating. But the milk solids are still ivory in color. Keep stirring in between.

7.It will bubble up and the milk solids go collect at the bottom. The top surface will look clearer as seen below.

Milk solids seperate
8.The milk solids are still light golden. This means you should cook for few more minutes.
9.Cook in low flame until the milk solids are golden in color. Check by stirring at the bottom. You should be very careful after this stage as it gets to brown / burn easily so be attentive and keep an eye.

Flavouring
10.Now add few of fresh curry leaves or rock salt or a small sprig of moringa leaves for flavour. This step is purely optional but gives more shelf life with a great flavour.

11.Cook for 1 more minute. Switch off.

12.The milk solids are now fully caramelised and turns brown in color as shown below. Switch off at once.

Straining
13.Immediately strain using a metal strainer. You can mix this with rice and have it or eat just the curry leaves alone tastes so good.

Ghee ready!
14.Homemade ghee is ready. Cool down then store. I usually store it in a glass jar in bulk then take just enough ghee in a small container to place it in kitchen for daily use. Store the rest in a cool spot and use whenever needed.
If adding to glass jar make sure it is heat resistant else cool down then store.

Always use a clean dry spoon everytime you take ghee.

Expert Tips
- You can use rock salt or curry leaves or drumstick leaves dipped in buttermilk and add it at the last stage for residue to completely bottom out.
- The residue can be mixed with rice and had, it will be very tasty. You can even add roasted wheat flour with nuts to make atta ladoos.
- I took the butter straight from the fridge so cooked in low flame else it will start burning.
- If ghee is not cooked properly,it will give raw flavour so be patient and cook in low flame.
- Adding drumstick leaves or curry leaves makes the ghee more flavourful and will help stay so for a longer time.
- Do the whole process in low or medium low flame to avoid burning.
- Always use a clean, dry spoon to take ghee to prevent contaminating and to retain flavour.
FAQS
1.I overcooked the ghee I believe, is it good to consume?
Over cooked ghee is fine to consume, however it might not be as flavourful as the right cooked one. Ghee gets to a overcooked state all of a sudden after 15 minutes of simmering – You can avoid overcooking by using heavy bottomed vessel, simmering in low heat and switching of stove once the milk solids gets to the bottom.
2.Can I make ghee from cream?
Yes – You can make ghee from cream by heating for a very longer time or with very high temperatures (like the one from large ghee manufacturing company). The best alternate at home to make from cream is to add drops of curd to cream and allow it to rest overnight (curdling). The next day, churn or blend to separate butter and then make ghee as prescribed in the recipe. Direct beating / blending of cream will not yield butter – hence curdling process is important.
3.Do I need to strain / filter the milk solids from ghee?
Literally no – you can consume as is however the shelf life might reduce significantly from a year to 4-6 months. The alternate is to strain and use clear liquid – the ghee- & the leftover milk solids for immediate consumption by drizzling it over rice or dosa or roti!
4.Is ghee good for health? Will I gain weight or add fat to body?
Ghee is an excellent source of good fats and regular consumption of ghee helps in removing toxins out of the cells, which improves metabolism and when your metabolism is fast, you lose weight.
5.What is A2 ghee? Bilona ghee?
The Ghee made using the milk of our native indigenous cows is mostly referred to as the A2 Ghee. Do you know – Indian variety of cow is more nutrient & vitamin rich than any other breed.
Bilona Ghee – Bilona is the traditional process of separating butter using wood churner from milk after curdling – Ghee made from the butter of this process is Bilona Ghee.

Shireen Sequeira
Wow, nice post Sharmi..never knew about the drumstick leaves & rock salt..will definitely try this!!
Divya Kudua
My mil does the same thing every week,any given time she'll have a fresh batch of butter in the fridge,a container full of homemade ghee and cream inside the fridge waiting for its turn to become butter or ghee:)
Angie's Recipes
Made ghee once…I like it. Better than the store-bought one.
Aarthi
wow…i can smell the pure ghee..yummy..Amma makes the same way..
Tina
perfect one..
Prathima Rao
Mom makes ghee atleast once a week..Always better than the store bought ones..Nicely explained post Sharmi..The ghee has a nice golden hue 😉
Prathima Rao
Prats Corner
Sushma Mallya
I love home meade ghee ….The smell of it is simply so authentic…my mom makes it and it's simply the best….Beautifully explained!!
faseela
informative post…….
Lijna
Good one..
Raksha
This is nice and I guess the aroma of ghee will be great. I too prepare this.
Do participate in my first event and giveaway "Desserts with Coconuts".
indianspicemagic
My grand ma prepares in the same way.How are you? I am missing you & all blog friends.Will be back soon.
Priya
Nothing will beat the home made ghee na..can feel the aroma of fresh ghee here..
Pavithra
Nice one and my MIL does the same way, she collects the paal aadai(cream from milk) everyday and then when planning to do butter add tsp of curd in the milk cream to make it as curd cream. then she churns in the mixie itself(using the chunner blade). Nothing beats home made ghee and butter.. i am really drooling. Even here in US i am making butter once in a while 🙂
Leena
I love homemade ghee and always prepare's at home.Easily explained with fabulous pics!
Torviewtoronto
looks wonderful sharmin
divya
wonderful post….
Asmita
This is so informative. I have always struggled with making ghee at home. I love the step by step method shown here. Will try making it at home using your method. Thanks for sharing.
M D
Awesome job with this post. Will help many who've never tried this at home.
Chitra
I too make ghee at home. i add little methi seeds at the end .. donno y 😉
Gopika Ram
Reminds me of my Mom's process 🙂 Awesome pics
soujanya
awesome…ghee looks grt!!
FoodEpix
Looks delicious. Would love for you to share this with us over at foodepix.com.
cumincoriandercardamom
The Ghee container brings back memories of my mom's kitchen
Swaminathan.J
I read elsewhere on the net that we should remove the white frothy fat that accumulates on the top [cholesterol] and then finally filter out the milk solids as you said. Of course, my family disagrees with me. They want the fat that gives the taste.
Sharmilee! :)
@Swaminathan : I am not sure of it as amma makes it this way. But if we are diet and cholestrol conscious then we have to avoid ghee itself 🙂
Anu
Hi Sharmi,
Excellent one. My amma too make the ghee in the same way by dropping drumstick leaves at the end. Which leave nice aroma. Once she be shifting the ghee into the container, she will be adding ragi flour in that ghee kadai with the drumstick leaves and added sugar or jaggery which will be very nice for having. Also, It got more strength in it.
Online Rock Salt
Wow, nice post Sharmi..never knew about the drumstick leaves & rock salt..will definitely try this!!
Rock Salt
Awesome job with this post. Will help many who've never tried this at home.
Varalakshmi
I add the rock salt, curry leaves, cloves, stem(thotima in telugu) of betel leaf, 5 drops each of butter milk and milk — Mom's suggestion 🙂
Suradeep Nath
i tried this, but since i didnt had mathu, i used food processor. i used the kneading blade and poured cleam and water to it. but the creme got whipped. how to do it in food processor?
Sharmilee! :)
@Suradeep : Are you asking for churning of butter? I am not sure of food processor but guess its same way I have said as in mixie too..cream should be sour enough to get the correct consistency
Vimal Kaur
hi sharmis….i made ghee yesterday. but i suppose i overdid it..it turned light brown rather than golden…my concern is whether i can use it or not bcas i prepared it for my 1 year old son..pls reply…
Sharmilee! :)
Light brown is kind of ok…You can filter and use it. Hope its not black..
Ruchika Bhandari
Hi Sharmi,
How much butter to use?
Thanks.
SHARMILEE J
Quantity is your preference only…it depends on how much quantity of ghee you want 🙂
janu
Hi sharmi, nice post…One question, I've prepared ghee. Now i would like to know how long will it be good.
I am just keeping it outside. I mean not in fridge.How do i know if its shelf life is over. So could u clarify this?
SHARMILEE J
It keeps well for about a month….even in room temperature
Ramya Ju
hi…can we use low fat butter?
SHARMILEE J
Yes you can try….
Priya Sushant
hi sharmi, thanks for the recipe. I like to try this. But please advice on the butter type. I should be buying aavin salted or saltless butter?
SHARMILEE J
Unsalted butter
sudhin
Hi Sharmi, am a fan of u. Tried many recipes from sharmispassion and turned out awesome always. So when i got a huge pack of unsalted butter i wanted to make ghee which i donno. Obviously ur name came in my thoughts! And here i am, found u and going to make ghee. Thanks a ton 😀
Unknown
Hai.. i have a doubt…can we use unsalted butter
SHARMILEE J
Yes you can use
R M Naganandan
I heated milk cream instead of butter…
How to use it now! Or is it waste!
Please suggest since it's half kilo cream I heated. And I heated waiting for ghee for 2 hours. It smells good and tastes good. Can i use it for making sweets and suggest me how to use it….
SHARMILEE J
Sorry.. I m not really sure….
Alboni - Boni's Healthy Twists
very useful recipe
R.VENKATARAMAN
1. is it necessary to filter the residue. ghee with residue is tasty
2. can the ghee be kept in fridge to avoid ants etc. or should it be kept not in the fridge?
gowthami
Thanks for the recipe. Especially for the tips to keep it low flame when butter is taken straight out of the fridge. I burnt it the first time keeping it in high flame
Meena
Your ghee is looking Golden and perfect texture. What a perfect picture. Great Job Sharmi.
Well explained method of making Ghee, We use only karuvepillai leaves & little methi seeds. Now i learnt rock salt and murugakeerai too. Thank you Sharmi, u r explaining very simple & easy way and your notes/tips really very helpful.