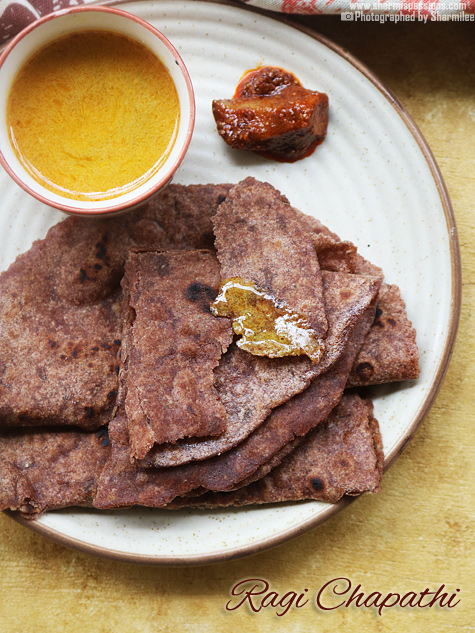
Ragi Chapathi is a tasty flat bread made by blending ragi flour with wheat flour in the making of chapathi. This recipe is an easy way to make your everyday chapathi more healthy and nutritious. The color is slightly darker than regular one but texture will be soft if made correctly. This recipe does not take long time and method is very easy.
This recipe can be a good choice if you want to include millets in daily food. Ragi is rich in calcium and fiber which supports bone health and digestion. It is filling and keeps stomach full for long hours. This can be served with dal, kurma or even curd. It is simple home style food which anyone can prepare.
Jump to:
About Ragi Chapathi
Ragi Chapathi is a variation of regular wheat chapathi where part of wheat flour is replaced with ragi flour. It is like normal chapathi in shape and cooking style. Only difference is the flour mix which makes it more nutritious. Texture will be soft when dough is kneaded well. If dough becomes dry then result may turn little hard.
Ragi is widely used and making chapathi with ragi is one of the easiest methods. This recipe is commonly prepared in homes. It does not need fermentation or grinding. This can be done quickly using simple steps. You can make this for breakfast or dinner without much effort.
Flavor is mild and slightly nutty because of ragi. It is not very strong so even kids will eat without complaints. You can adjust the wheat and ragi flour ratio based on your liking and after experimenting. Some people try fully ragi version but it may crack while rolling. Mixing both flours gives better balance and softness.
I usually prepare this for dinner during busy weekdays. My family eats this with simple dal or vegetable gravy. It works well for lunch box also.
Ragi Chapathi Ingredients
- Ragi flour - I roast the ragi flour before mixing it. It has a nice nutty flavor and good nutrition, you can use fresh homemade flour or even store bought one.
- Wheat flour - I add this together with ragi flour for better binding and it gives soft texture.
- Jeera - I add for light crunch and mild flavor in every bite. You can replace it with ajwain or skip if you do not prefer.
- Ghee - I added small amount of ghee while kneading the dough. It gives softness and slight richness, you can use oil instead of ghee.
Similar Recipes
How to make Ragi Chapathi Step by Step
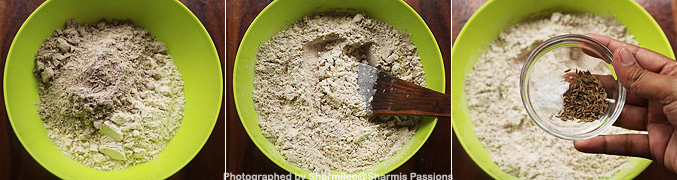
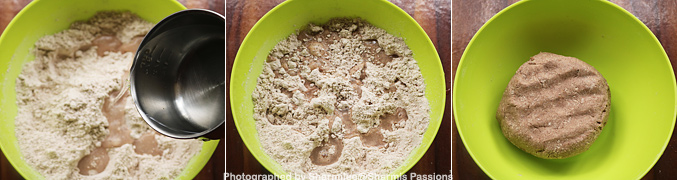
1.To a mixing bowl, add wheat flour and set aside. Now roast ragi flour in low flame for 3-5 minutes without changing the color of the flour. Cool down completely.

2.Add this flour to wheat flour. Mix well with a ladle. Now add salt and jeera
3.Add ghee. First mix well with your finger tips.
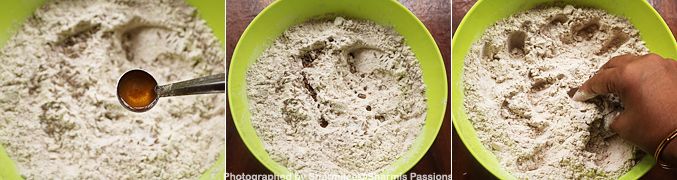
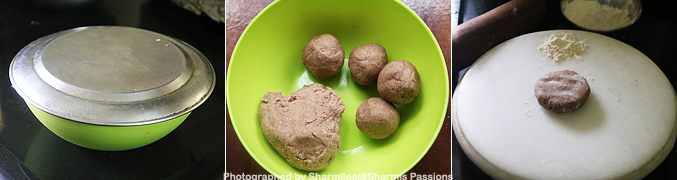
4.Add water little by little to form a smooth dough.
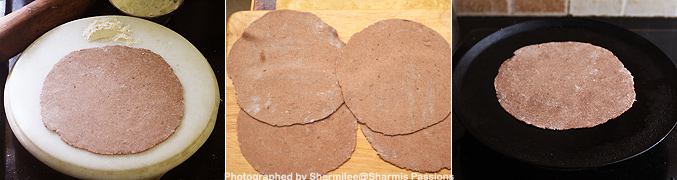
5.Rest it for 15 minutes. Pinch lemon equal sized balls and roll them to form smooth balls. Place a ball and slightly flatten it, sprinkle flour.
6.Roll them into slightly thin rotis. Don't make it very thin it will start tearing. Heat tawa, carefully place the roti.
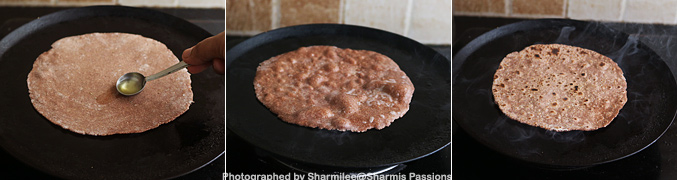
7.Drizzle oil.Once bubbles start forming flip and cook. Cook until brown spots appear here and there.
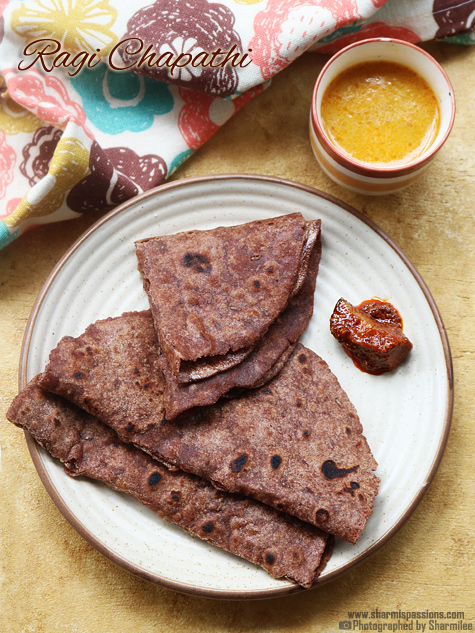
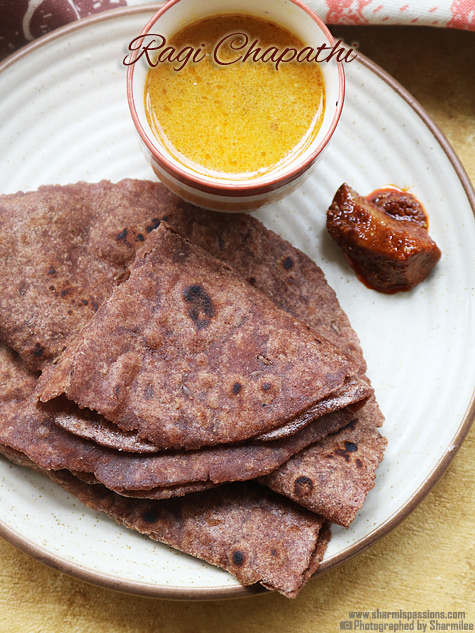
Serve hot / warm.

Expert Tips
- Roasting - I always roast the ragi flour on low heat without changing its color. This step removes the raw smell and the taste becomes more better.
- Knead dough - I make sure the dough is soft and smooth, not too tight. If the dough is tight then the chapathi can turn dry and hard after cooking.
- Resting - I usually rest the dough for at least 15 minutes. This helps the flour to absorb water properly and rolling becomes more easier.
- Rolling - I do not roll it very thin because it can start tearing while lifting. I keep it in medium thickness so it stays soft after cooking.
- Cooking Tip - I cook on medium heat and flip it when bubbles appear on top. If the flame is very high it can become hard and slightly dry.
Serving and Storage
Serve this with simple dal, vegetable gravy or spicy chutney. This goes well with curd also. You can pack it for lunch box without any problem. Store leftover chapathi in fridge for up to two days. Reheat on tawa with little ghee and serve warm.
FAQS
1.Can I skip roasting the ragi flour?
Yes you can skip if you are short on time. But roasting removes raw smell and gives better taste.
2.Why is my dough cracking while rolling?
Your dough may be not rested enough. You can just add few drops of water and knead again till smooth.
3.Can I make skip the wheat flour?
You can try but texture may not be very soft. It may crack while rolling if not handled carefully.
4.Can I add chopped greens to the dough?
Yes you can add coriander or spinach finely chopped. Taste will change slightly but it will be good.
5.Is this good for weight control?
It can be part of balanced diet because ragi has fiber. Portion control is still important for any meal.
If you have any more questions about this Ragi Chapathi Recipe do mail me at sharmispassions@gmail.com. In addition, follow me on Instagram, Facebook, Pinterest, Youtube and Twitter .
Tried this Ragi Chapathi Recipe? Do let me know how you liked it. Also tag us on Instagram @sharmispassions and hash tag it on #sharmispassions.
📖 Recipe Card
Ragi Chapathi Recipe
Ingredients
- 1 cup wheat flour
- ½ cup heaped ragi flour
- 1 teaspoon jeera
- 1 teaspoon ghee
- salt to taste
Instructions
- To a mixing bowl, add wheat flour and set aside.
- Now roast ragi flour in low flame for 3-5mins without changing the color of the flour. Cool down completely.
- Add this flour to wheat flour. Mix well with a ladle.
- Now add salt and jeera. Add ghee.
- First mix well with your finger tips. Add water little by little to form a smooth dough.
- Rest it for 15 mins. Pinch lemon equal sized balls and roll them to form smooth balls. Place a ball and slightly flatten it, sprinkle flour.
- Roll them into slightly thin rotis. Don't make it very thin it will start tearing.
- Heat tawa, carefully place the roti.
- Drizzle oil. Once bubbles start forming flip and cook. Cook until brown spots appear here and there. Enjoy Ragi Chapathi!
Notes
- Roasting - I always roast the ragi flour on low heat without changing its color. This step removes the raw smell and the taste becomes more better.
- Knead dough - I make sure the dough is soft and smooth, not too tight. If the dough is tight then the chapathi can turn dry and hard after cooking.
- Resting - I usually rest the dough for at least 15 minutes. This helps the flour to absorb water properly and rolling becomes more easier.
- Rolling - I do not roll it very thin because it can start tearing while lifting. I keep it in medium thickness so it stays soft after cooking.
- Cooking Tip - I cook on medium heat and flip it when bubbles appear on top. If the flame is very high it can become hard and slightly dry.


Anlet Prince - Annslittlecorner
Love the color of these clicks...
sathya
Last pic s very lovely Sharmi😍😍😍What gravy s tat and gang to try sooner ur rahi chapathi😀
Sharmilee J
That is empty kurma 🙂
sathya
Hehehhe😁😁 Sharmi can u post receipe for egg Martha plzzzzzz
sathya
Sry little bit spell mistake tat s egg paratha and one more doubt wat s diff btw levelled and heaped
Nilam cahudhary
Love this recipe so much, A very healthy and tasty dish Thanks a lott for sharing