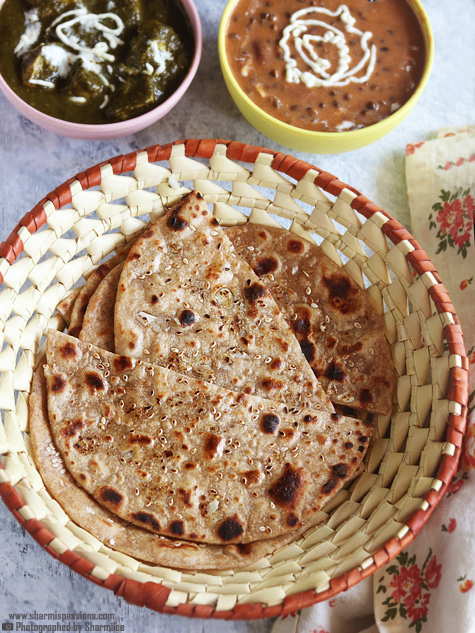
Garlic roti is a flavorful paratha made by mixing minced garlic with wheat flour in the usual way of making paratha and topped with sesame seeds and moregarlic. This recipe has a mild spicy taste and has a strong garlic aroma that comes out really nice while cooking on the tawa. When compared to regular plain roti, this feels more flavorful, tasty and a bit richer too.
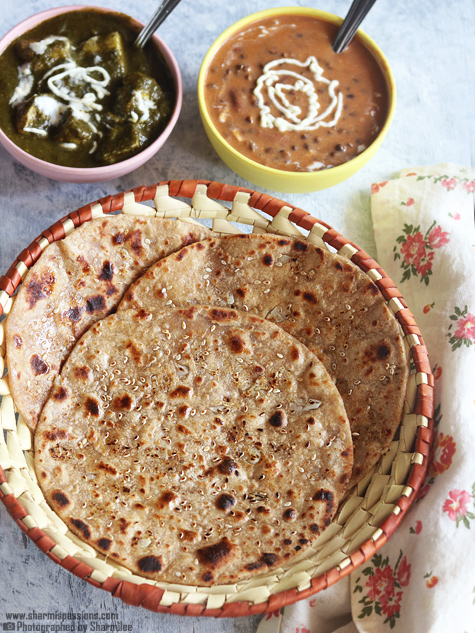
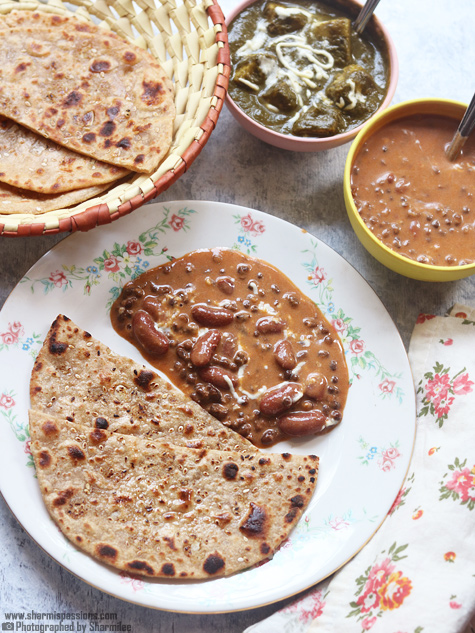
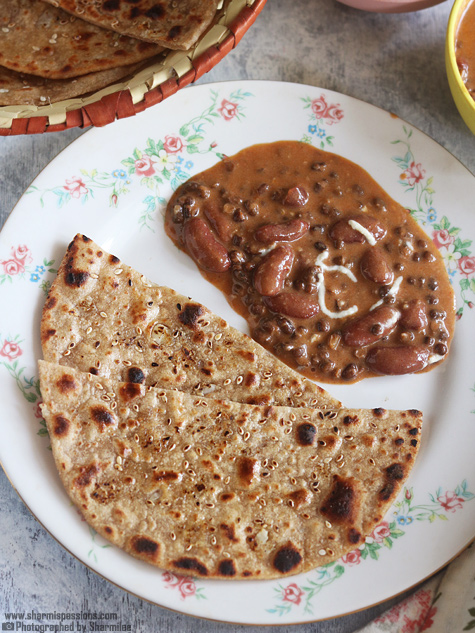
Garlic Roti is a good option when plain rotis start feeling boring at home. Garlic has added flavor without making the roti heavy or too spicy. This recipe has become a good choice for simple meals. Garlic roti goes well with simple curries, dal or even curd. It tastes too good when served hot straight from the tawa.
Jump to:
About Garlic Roti
Garlic Roti is just a simple twist to the regular wheat roti that is made almost every day in many homes. In this recipe, crushed garlic has been mixed into the dough and also spread on top while rolling. This helps the garlic flavor spread evenly and cook well without staying raw.
This is more of a home-style garlic roti and has nothing like restaurant naan texture. Sesame seeds have added a light crunch and mild nutty taste which goes really well with garlic. When cooked properly, the roti has stayed soft inside with small golden spots on the outside.
You can also make small variations that can be tried according to your taste. Some people add chilli flakes or chopped coriander leaves for extra flavor. Multigrain atta can also be used which has made the roti more filling. Still the taste comes out good and balanced.
I make this for dinner or weekend meals when craving something different. This recipe has not taken much extra effort but still feels special once served hot.
Garlic Roti Ingredients
- Wheat flour/Multigrain atta - I just added this to make the dough. It gives softness and helps hold everything together well.
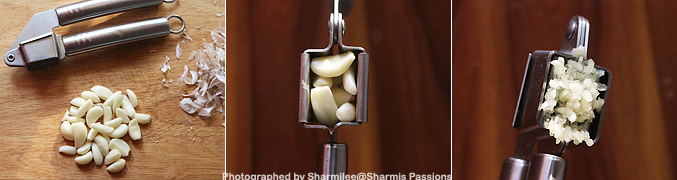
- Garlic - I have used fresh garlic and crushed it well. It gives strong aroma and mild spicy taste. I have also finely chopped it when garlic press is not there.
- Oil - I have added oil while kneading the dough, helps keep the rotis soft even after cooling. Ghee can be used for more flavor.
- Sesame seeds - I have used these on top of the roti. It gives light crunch and nutty taste. I have mostly used white sesame seeds, black ones can be used too.
- Oil / butter / ghee - I brushed butter or ghee after cooking. It adds shine and extra taste, you can also use oil if needed.
Similar Recipes
How to make Garlic Roti Step by Step
1.Separate garlic pearls from pod then remove the skin from them. You can either chop it finely or crush it. I used my garlic press. Collect crushed garlic in a bowl and set aside.
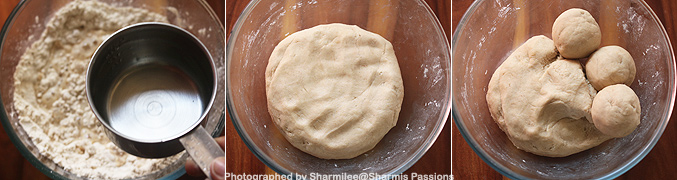
2.In a mixing bowl take wheat flour, add required salt, half of crushed garlic, oil. Mix well with your finger tips.
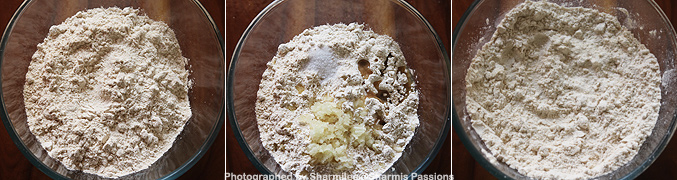
3.Add water little by little to form a smooth pliable dough just like chapathi dough. Set aside for 10 minutes. Make big lemon sized balls.
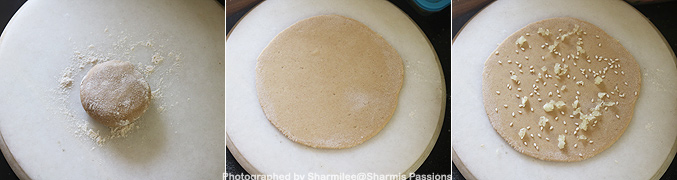
4.Place on a chapati roller and roll it using a rolling pin to a slightly thick roti. Sprinkle flour if needed. Sprinkle sesame seeds and spread crushed garlic.
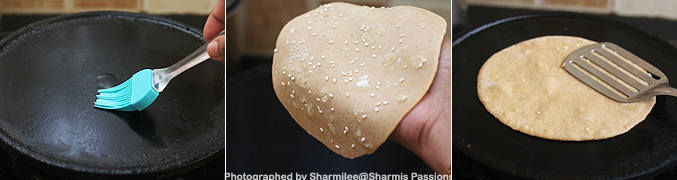
5.Slightly roll it for pressing like wise make all your rotis.

6.Sprinkle oil on the tawa, carefully place a roti with the sesame side down on the tawa. Press it with a ladle for even cooking.
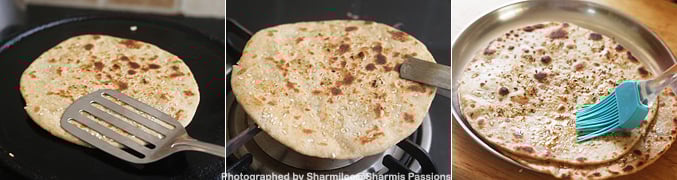
7.Flip over, press and cook until golden brown spots appear here and there. Alternately you can cook one side(with the garlic side down) in tawa and flip and cook in direct flame as we do for phulkas. Make the rotis.Brush it with butter/ghee.
Serve hot!
Expert Tips
- Garlic - I crush the garlic using a garlic press. You can even fine chop and use it too. Big pieces may taste raw.
- Resting - I rest the dough for 10 minutes. This helps make the rotis soft and easy to roll. I never skip this step.
- Flame - I keep the flame in medium as garlic burns very fast. Slow cooking give better flavor and even cooking.
- Pressing - I gently press the roti using a ladle while cooking. This helps it cook evenly and puff slightly.
- Brushing - I just brush butter or ghee after cooking. This keep the rotis soft for longer time and add nice taste.
Serving and Storage
Serve them hot with veg kurma, dal or paneer gravy. This also goes well with curd and pickle. Garlic roti tastes best when fresh. Leftovers can be stored in fridge for one day. Reheat on tawa with few drops of oil.
FAQS
1.Can sesame seeds be skipped?
Yes, sesame seeds can be skipped easily. Garlic flavor alone has enough taste to make the roti enjoyable.
2.Will garlic taste raw?
No, if cooked on medium flame, garlic has cooked well and raw taste will not be there.
3.Can garlic paste be used?
Yes, garlic paste can be used, but fresh crushed garlic has given better aroma and flavor.
4.Can this be cooked like phulka?
Yes, one side has to be cooked on tawa and then cooked on direct flame like phulka.
5.Is this suitable for kids?
Yes, this recipe has worked for kids too. Just reduce garlic quantity slightly and it tastes fine.
If you have any more questions about this Garlic Roti Recipe do mail me at sharmispassions@gmail.com. In addition, follow me on Instagram, Facebook, Pinterest ,Youtube and Twitter .
Tried this Garlic Roti Recipe? Do let me know how you liked it. Also tag us on Instagram @sharmispassions and hash tag it on #sharmispassions.
📖 Recipe Card
Garlic Roti
Ingredients
- 2 cups wheat flour / multigrain atta
- ¼ cup garlic pearls
- 2 teaspoon oil
- 2 teaspoon sesame seeds
- salt to taste
- water as needed
- oil / butter / ghee to toast
Instructions
- Separate garlic pearls from pod then remove the skin from them. You can either chop it finely or crush it. I used my garlic press. Collect crushed garlic in a bowl and set aside.
- In a mixing bowl take wheat flour, add required salt, half of crushed garlic, oil. Mix well with your finger tips.
- Add water little by little to form a smooth pliable dough just like chapathi dough. Set aside for 10mins. Make big lemon sized balls.
- Place on a chapathi roller and roll it using a rolling pin to a slightly thick roti. Sprinkle flour if needed. Sprinkle sesame seeds and spread crushed garlic.
- Slightly roll it for pressing, like wise make all your rotis.
- Sprinkle oil on the tawa, carefully place a roti with the sesame side down on the tawa. Press it with a ladle for even cooking.
- Flip over, press and cook until golden brown spots appear here and there. Alternately you can cook one side(with the garlic side down) in tawa and flip and cook in direct flame as we do for phulkas. Make the rotis. Brush it with butter/ghee. Enjoy Garlic Roti!
Notes
- Garlic - I crush the garlic using a garlic press. You can even fine chop and use it too. Big pieces may taste raw.
- Resting - I rest the dough for 10 minutes. This helps make the rotis soft and easy to roll. I never skip this step.
- Flame - I keep the flame in medium as garlic burns very fast. Slow cooking give better flavor and even cooking.
- Pressing - I gently press the roti using a ladle while cooking. This helps it cook evenly and puff slightly.
- Brushing - I just brush butter or ghee after cooking. This keep the rotis soft for longer time and add nice taste.

Sharmilee J
I bought it from a local shop here, try online.The brand I use is Mosaic
Shruthi
Hi Sharmi,
Very simple and tasty and healthy dish.
We really enjoyed it
Thanks for the post.