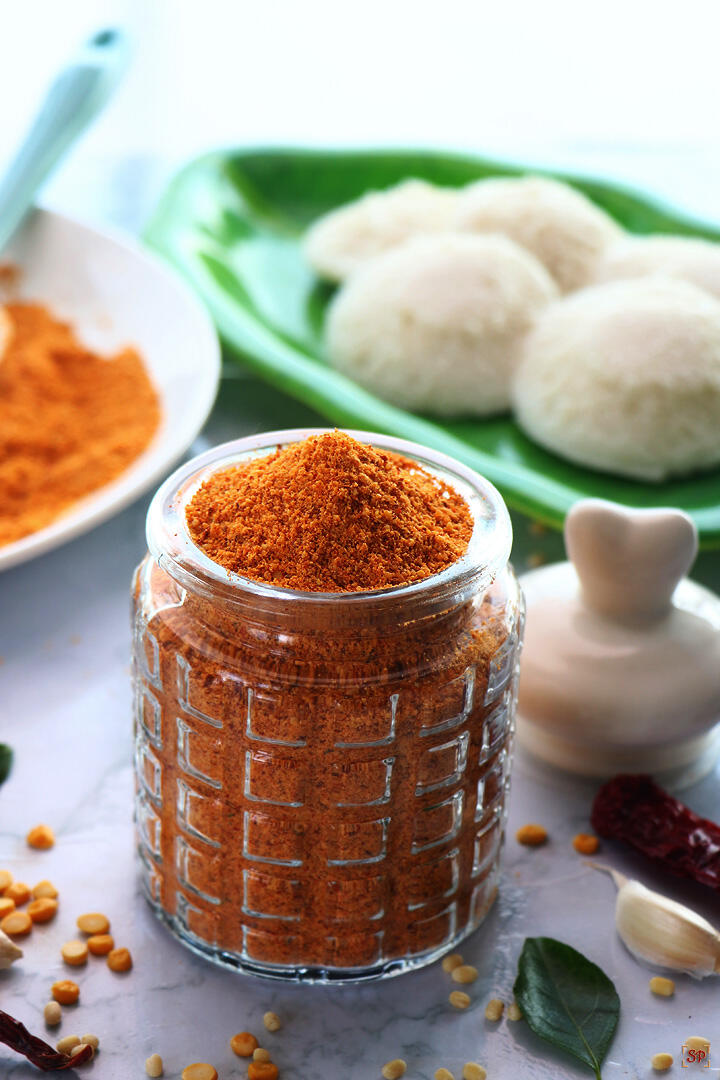
Idli Podi is a dry condiment made using lentils, spices and red chilies. Idli Podi is a staple in South Indian homes which serves as an accompaniment for idli and dosa. Idli Podi is also called as Idli Milagai Podi. Learn to make Idli Podi Recipe with step by step pictures and video.
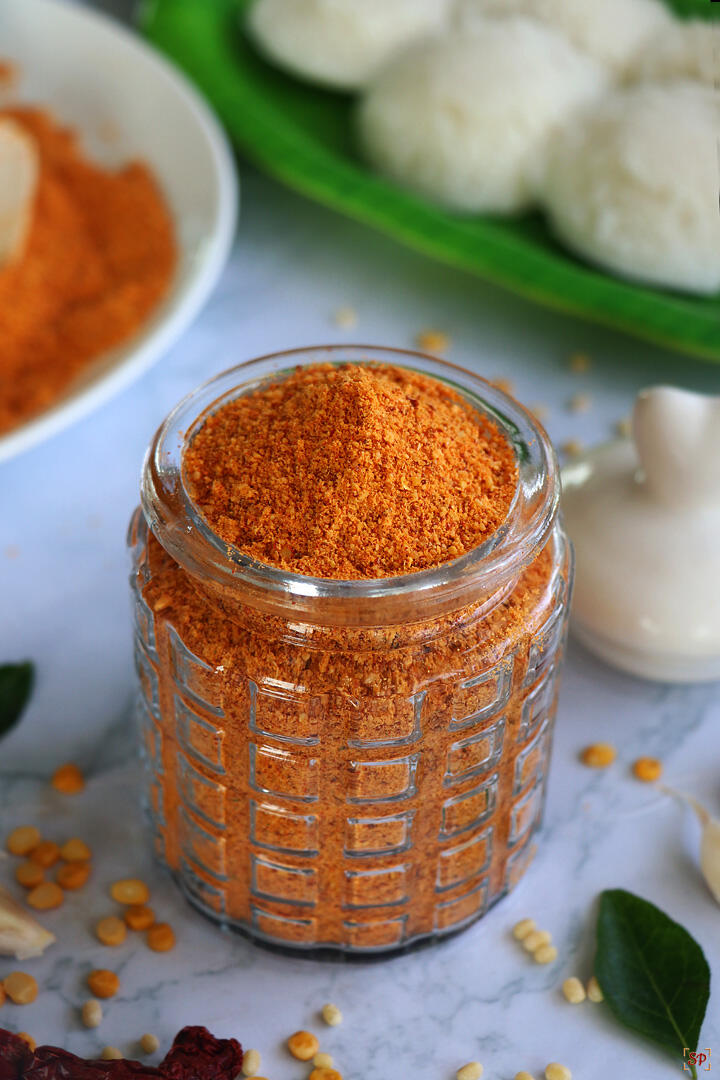
Idli Podi is a spicy chutney powder which serves as a great side dish for idli and dosa. It comes to my rescue when I don't have time to make side dish and makes a great alternate to chutney.
Jump to:
What is Idli Podi?
Idli Podi also known as Gunpowder or Idli Milagai Podi is a spicy and flavorful side dish for idli and dosa. It is a dry powder made using a combination of roasted lentils, dried garlic, red chilies, sesame seeds, hing and other spices. It is known by different names which varies in each household like Idli Podi, Idli Milagai Podi, Chutney Powder, Gun Powder, Idli Karam Podi, thool etc.
Idli Milagai Podi or Idli Podi - Idli is steamed rice cakes, Milagai is red chillies and Podi is powder so it translates to a dry spicy condiment in powder form for idli. It is popularly called Idli Podi but serves as a great side dish for dosa too.
Podi Idli is made by smearing idlis with idli podi and sesame oil or ghee. Podi idli and Podi dosa, Podi oothapam are popular orders at restaurants. The taste of Idli Podi has a slight crunch from the lentils, aromatic flavor from curry leaves, garlic, earthy and nutty taste from all other roasted ingredients.
Idli Milagai Podi or Idli Podi is my favorite and can have it even daily. Idli podi or podi or thool as we call it, plays a vital role in every South Indian homes. Lazy?! no side dish at home, this Idli Podi comes to our rescue.
I am sure each one has their own version and here is mine. I have tried different versions of Idli Podi but this is my recipe which I am making for many years now. This Idli Podi is my go to recipe and as my friends, neighbors like that I often make a big batch to share it with them.
Similar Recipes
How to make perfect Idli Podi?
- Choose the perfect measure of ingredients that balances well.
- Always use fresh ingredients, clean it and use.
- Roasting each ingredient till desired stage is the key for perfect tasting idli podi. Always use low flame or low medium flame while roasting.
Idli Podi Video
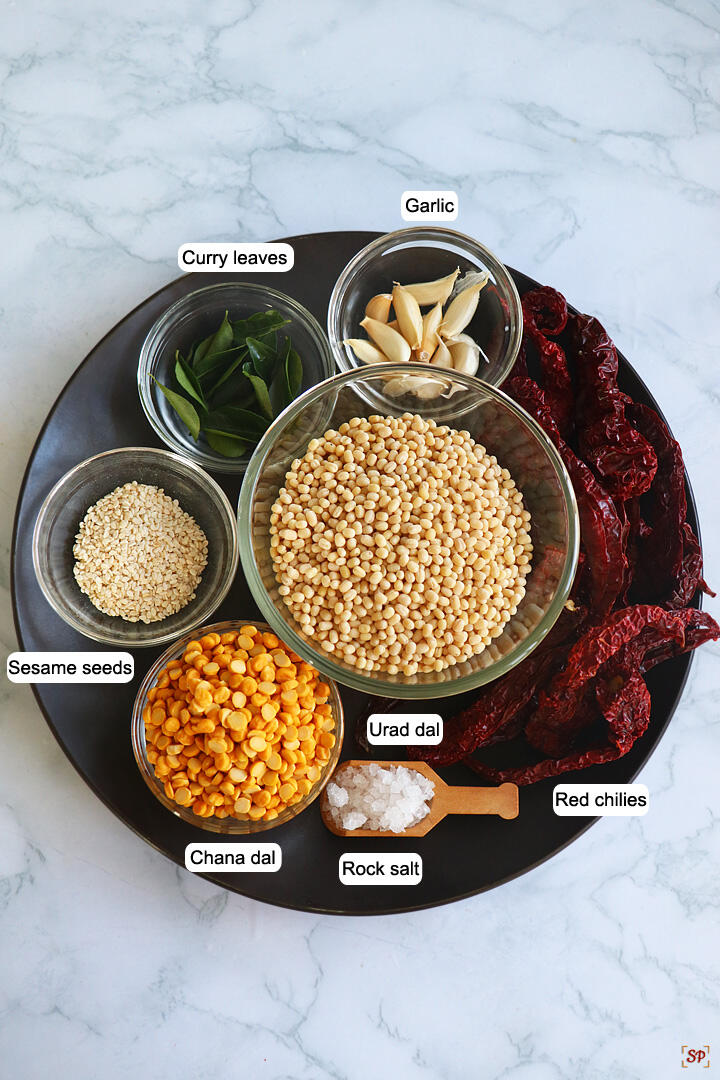
Idli Podi Ingredients
- Lentils : Whole urad dal and chana dal are the main ingredients for Idli podi. The measure differs in each household.
- Red Chillies : I use a either a combination of regular red chillies with kashmiri red chillies or just kashmiri red chillies to reduce spice level and get a natural orangish color.
- Others : Garlic and Curry leaves are added for adding great flavor to idli podi. I don't make idli podi without garlic not only for flavor but also it helps in reducing gas and indigestion. Sesame seeds adds a great texture to the podi.
- Salt : I always prefer using rock salt. If using rock salt always dry roast and add it while grinding to avoid letting out water. If using regular salt, you add it as such while grinding.
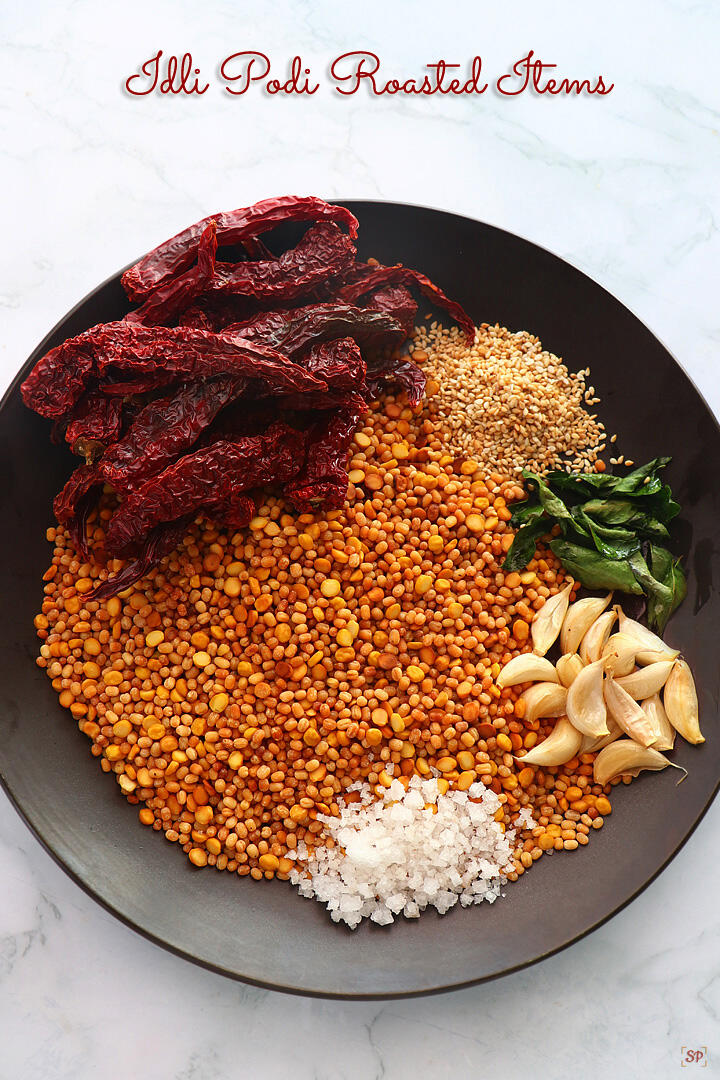
Roasting each ingredient perfectly is the key for making great tasting Idli Podi. So make sure to be patient and roast each ingredient in low flame. Keep stirring to avoid burning.
You can even roast red chilies separately but make sure not to burn it. Garlic skin can be peeled and roasted too but with skin gives nice flavor. Make sure to rinse garlic and curry leaves prior to roasting and dry it up then add for roasting.
How to make Idli Podi Step by Step
1.To a heavy bottomed kadai add 1 cup whole urad dal(without skin) and 6 tablespoon, chana dal.
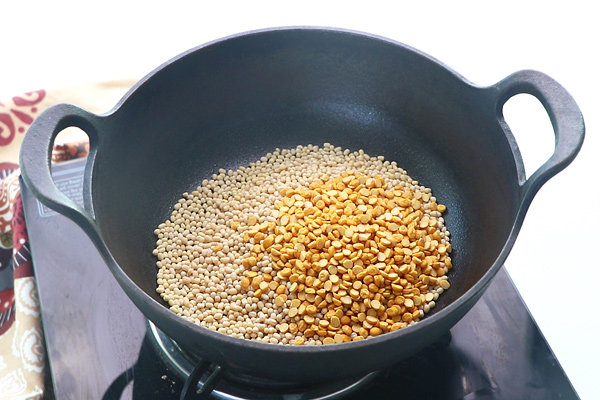
2.Add 20-25 red chillies. Either use half and half of regular red chillies or use kashmiri chillies iteslf. I used 20 kashmiri red chillies. Adding red chillies along with dal while roasting helps in avoiding burning of red chillies.

3.Dry roast it slowly in low flame. Keep stirring without burning.

4.Roast until dals turn golden brown and red chillies turn crisp. Transfer to the same plate and set aside.

5.Heat ½ teaspoon oil then add 15 nos small sized garlic(with skin).

6.Roast until golden. Transfer to the same plate and set aside.

7.Now add ¼ cup curry leaves.

8.Roast until crisp. Transfer to the same plate and set aside.

9.Now add 1 tablespoon sesame seeds.

10.Roast until golden and let it pop. Transfer to the same plate and set aside.

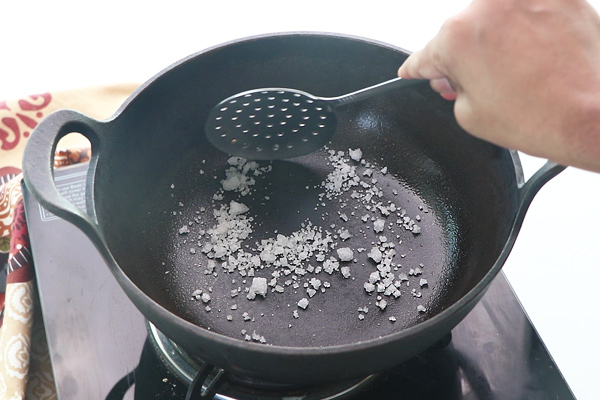
11.Finally add rock salt.

12.Dry roast for few seconds. Transfer to the same plate and set aside.
13.Cool down the ingredients completely.

14.Transfer to a dry mixer jar.

15.Add a generous pinch of hing.

16.Grind it slightly coarse as shown below.

17.Spread it on a plate and cool down.

18.Store in a dry jar and use it.

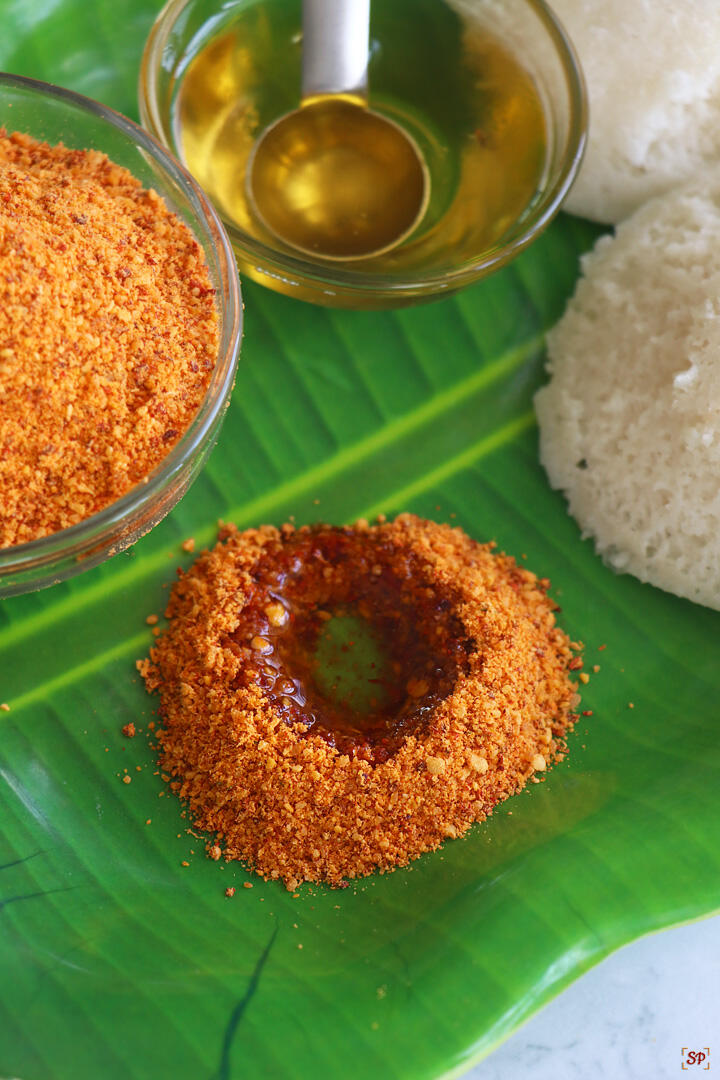
Serve with hot idlis and enjoy!
Expert Tips
- Garlic can be crushed and added. Mine was very small so addded as such if your cloves are big then crush it slightly then add it. Add garlic with skin as the flavor of garlic catches up in the podi very well if done this way.
- You can even reserve 2 raw garlic and add it while grinding without roasting this enhances the garlic flavor.
- The color of the podi purely depends on the chilli variety and the amount of chillies we use.
- Slow roasting is the key for making perfect Idli Podi.
- Roasting red chillies with dal ensures even roasting and will not burn red chillies.My mother always insists not to roast red chillies alone.
- Adjust spice level according to ur preference.
- You can even add a teaspoon of roasted jeera while grinding for extra flavor.
- It keeps well for 2-3 months in room temperature.
- If using solid hing (katti perungayam) then roast it for few seconds then add it while grinding. I used hing powder so added as such.
Variations
- You can skip sesame seeds if you want but other ingredients are a must.
- Adding a tablespoon of coconut gives good flavor. Roast until golden brown and add it while grinding but the shelf life reduces.
- You can replace with kashmiri red chillies with regular red chillies but make sure to reduce the quantity around 15 willb e perfect for this measure.
Serving and Storing
Idli Podi is usually mixed with gingelly oil and served with Idli, Dosa. This podi can be stored for 3 months in room temperature and used.
FAQS
1.Why it is called Idli Podi?
Idli Podi is a dry homemade condiment made using lentils, spices and red chillies. In tamil milagai is chillies and podi means powder, as we serve it with idli it is called Idli Milagai Podi in short Idli Podi.
2.How can I serve Idli Podi?
Idli Podi is mixed with gingelly oil and served with idli, dosa and oothapam. You can even spread podi mixed with oil on idlis and serve it. You can mix it with ghee while serving it for kids.
3.How long can we store Idli Podi?
Idli Podi keeps well in room temperature for around 3 months if handled properly.
4.What else can I use this Idli Podi for?
You can use it for making podi idli, or even add it to curries / stir fries for giving it a different taste. Cut leftover idlis toss it in heated gingelly oil along with idli podi to make idli podi.
5.What does Idli Podi taste like?
Idli Podi is slightly crunch from the lentils with a nutty aroma and taste from the spices.
Traditionally gingelly oil is added to idli podi mixed well to serve it along with idli or dosa but more popular with idli so named as idli podi.
If you have any more questions about this Idli Podi Recipe do mail me at sharmispassions@gmail.com. In addition, follow me on Instagram, Facebook, Pinterest, Youtube and Twitter .
Tried this Idli Podi Recipe ? Do let me know how you liked it. Also tag us on Instagram @sharmispassions and hash tag it on #sharmispassions.
📖 Recipe Card
Idli Podi | Idli Milagai Podi
Ingredients
- 1 cup whole urad dal You can use whole black urad dal too
- 6 tablespoon chana dal
- 20 nos kashmiri red chillies
- 15 nos garlic pearls
- ¼ tablespoon loosely packed curry leaves
- 1 tablespoon sesame seeds
- a generous pinch hing
- rock salt to taste
Instructions
- To a heavy bottomed kadai add 1 cup whole urad dal(without skin) and 6 tablespoon, chana dal.
- Add 20-25 red chillies. Either use half and half of regular red chillies or use kashmiri chillies iteslf. I used 20 kashmiri red chillies. Adding red chillies along with dal while roasting helps in avoiding burning of red chillies.
- Dry roast it slowly in low flame. Keep stirring without burning.
- Roast until dals turn golden brown and red chillies turn crisp. Transfer to the same plate and set aside.
- Heat ½ teaspoon oil then add 15 nos small sized garlic(with skin).
- Roast until golden. Transfer to the same plate and set aside.
- Now add ¼ cup curry leaves.
- Roast until crisp. Transfer to the same plate and set aside.
- Now add 1 tablespoon sesame seeds.
- Roast until golden and let it pop. Transfer to the same plate and set aside.
- Finally add rock salt.
- Dry roast for few seconds. Transfer to the same plate and set aside.
- Cool down the ingredients completely.
- Transfer to a dry mixer jar.
- Add a generous pinch of hing.
- Grind it slightly coarse as shown below.
- Spread it on a plate and cool down.
- Store in a dry jar and use it.
- Serve Idli Podi with hot idlis / dosa and enjoy!
Video
Notes
- Garlic can be crushed and added. Mine was very small so addded as such if your cloves are big then crush it slightly then add it. Add garlic with skin as the flavour of garlic catches up in the podi very well if done this way.
- You can even reserve 2 raw garlic and add it while grinding without roasting this enhances the garlic flavour.
- The color of the podi purely depends on the chilli variety and the amount of chillies we use.
- Slow roasting is the key for making perfect Idli Podi.
- Roasting red chillies with dal ensures even roasting and will not burn red chillies.My mother always insists not to roast red chillies alone.
- Adjust spice level according to ur preference.
- You can even add a teaspoon of roasted jeera while grinding for extra flavour.
- It keeps well for 2-3 months in room temperature.
- If using solid hing then roast it for few seconds then add it while grinding. I used hing powder so added as such.
M SUSMA
Love the bright color of the podi,sure will try this for sharu
AparnaRajeshkumar
i have not tasted the jaggery version milagai podi 😀 very stunning photos
Sony P
Perfect for idly ...... Yummy !
M D
Yum Sharmi. I am drooling over that milagai podi!
Chitra Ganapathy
I too make the same way with slight variations 🙂 Lovely clicks 🙂
Veena Theagarajan
It is a must for me for any south Indian breakfast.. My mum makes it slightly different.. I never tried on my own.. Must try
jeyashri suresh
Lovely pictures, fantastic recipe
Sundari Nathan
Awesome pics as always 🙂 Mine is a similar version too..
Malathi ganesh
Hi Kate.. We prepare chutney podi in same process..but adding jaggery is mouth watering. Surely I'l try the next time I grind 🙂
My attempt at The Julie/Julia project
I love the color of podi... looks very mouth watering. and love ur soft white idlis... they are perfect. love ur presentation too.
Sheeba's World
Will try this...Waiting for Bread Upma sharmi...
sriabi gopi
Great pics. It is a treat to watch the pic so no doubt about the taste.
sriabi gopi
Great pics great recipe.
Anu
Tried and it tasted yummmmmm!
jp
hi i tried it and turned out quite well though i think i went a bit overboard with d curry leaves , it has an overpowering aroma of curry leaves. thanx for sharing.
Pavithra
Can I omit the garlic?
SHARMILEE J
Yes you can omit it....
Melissa Gobi
i dont have jaggery.can i use white sugar?
SHARMILEE J
Not sure if it will work.....
prakash
Hi sharmi, tried dis recipe today dis is my first idli podi recipe n turned out yummy as I desired vthout jaggery n at last added too much jaggery n messed it it's too sweet, is der any way to get d taste bak, pls help me asap
SHARMILEE J
What you can do is dry roast urad dal and red chilli seperately, grind it and add to the podi...THe quantity depends on the sweetness...
Thenmozhi Murugesan
Dear Sharmi,should we use black yeas dhal or the white one? I prepared this version but did not get this bright red color. How to get this color for the podi?
SHARMILEE J
I used whole urad dal without skin so its white in color...The red color depends on the chilli variety you use
Nikki P
yummy idli poli..my fav with idli..reminds me of Sree Krishna cafe in Bangalore 🙂
sowmiya sabarinath
Shall I skip sesame
SHARMILEE J
Yes you can
யோகன் பாரிஸ்(Johan-Paris)
சகோதரி- எனக்கு ஆங்கிலம் வாசிக்க முடியும், தவறின்றி எழுத முடியாது. அதனால் தமிழில் மன்னிக்கவும்.
நான் இலங்கையை சேர்ந்தவன், இந்தப் பொடிகள் எங்கள் பகுதி உணவில் இல்லை எனலாம்.
தோசை, இட்லிக்கு சம்பல்தான்- சாம்பாரே இல்லை. இலங்கையில் சில தடவையும்,சென்னை வந்த போதும் சாப்பிட்டேன். அதன் மணம், சுவை பிடித்தது. ஆனாலும் நம் வீட்டில் செய்யத் தெரியவில்லை. இன்று இட்லி - கூகிளாண்டவரைப் பொடி போடும் விபரம் கேட்டபோது, உங்கள் பக்கம் காட்டினார்.
தாங்கள் இட்ட படங்கள் உடனே அதைச் செய்து விடலாமெனும் நம்பிக்கையைத் தந்தது. அருமை - படங்கள் பல வரிகளில் சொல்வதை , தெளிவாகத் தருகிறது. உதாரணம்- மிளகாய் அளவு பிடிபடவில்லை. ஆனால் தங்கள் படத்தில் எண்ணி, சுமார் 25 எனப் பிடித்து விட்டேன்.
அத்தனை கலவைப் பொருட்களும் வீட்டில் இருந்ததால், செய்து சாப்பிட்டு விட்டே, வெற்றிக்கு வழிகாட்டிய உங்களுக்கு நன்றி கூற எழுதுகிறேன்.
அருமை-அருமை- நன்றி
உங்களைப் பற்றிப் படித்தபோது, உங்களுக்கு புகைப்படக்கலையிலும் ஆர்வமென்பதை அறிந்தேன். படங்களில் அது தெரிகிறது.ஏனைய உணவுகளையும் முயல்வேன். அனுபவத்தைப் பகிர்வேன்.
Sharmilee J
Mikka nandri ivlo azhagaga tamilil comment pathivuku 🙂
suchi suvvaru
This is the first time im making chutney powder.. its an awesome recipe..
Ramya
I have tried this many times, it has come out very well each and every time! We are big on Idly Podi for Idly and this is our one of the fav version. You have a wonderful space here Sharmi!
MADAN MOHAN
Good. Some times we add roasted coconut also. Seasame seeds,White seasame is preferred.
MATHANMOHAN
Chetu
i tried this andvt has come out yummy 🙂 thanks.
Usha Sai
Maam iam addicted to your website .any reference with regards to cooking iam so confident i will find it in your site.
Your techniquesare so homely .Thank you
Mary
I totally agree with all the comments. What was not my favorite baat has become so with this position..Its awesome. Thanks so much for sharing your skills
Mary
Sorry..My previous comment somehow got corrupted.
What I meant is what was not my favourite breakfast, now IS because of this podi. Really love the touch of jaggery..Thanks so much for sharing your skill
Geetika
What is the shelf life of this powder ? Does adding garlic and jaggery reduce the shelf life?
Sharmilee J
no
Sarah David
Love this podi and esp the garlic flavour. Thank u so much!
Manjula Paul
Hi Sharmi, Thank you very much for the recipe. Is it necessary to refrigerate the podi since it has roasted garlic (not completely dry)?
Sharmilee J
No no not needed it becomes dry after roasting and grinding so keeps well atleast 2 -3 months in room temperature itself.
Preetha Masillamanie
When we dry roast the rock salt does it not absorb the oil from the kadai hence making it moist again? That's the only doubt I have.
Sharmilee J
No it will not absorb as we adding only very little oil. It will look oily but not moist.