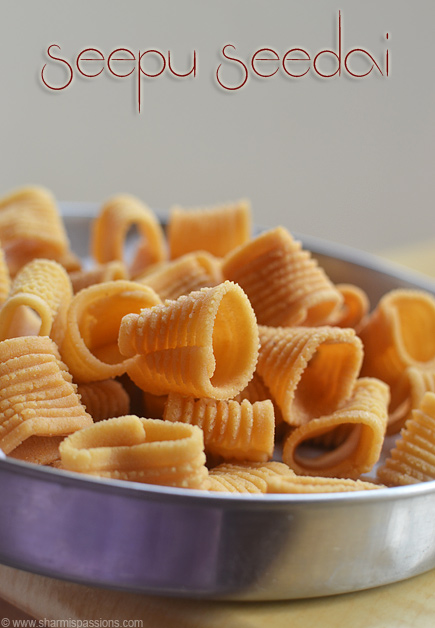
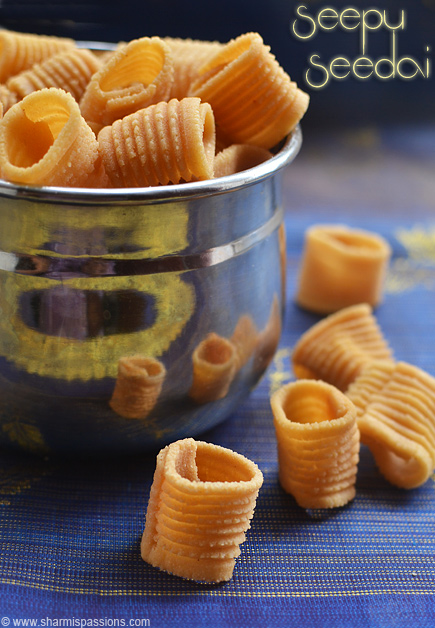
Seepu Murukku is a traditional South Indian snack from the Chettinad region, known for its flavor and comb-like pattern. This recipe is made with a mix of rice, urad dal, and fried gram dal, which gives it a unique taste and crunch. Coconut milk adds a rich fragrance, making it even more special. Follow the step by step instructions to make perfect Seepu Murukku.

Seepu Murukku or Seepu Seedai as we call it is a perfect snack for festivals or any time you crave something crispy. The best part is that it's not just tasty but also a healthier alternative to many store-bought snacks, as it's made with simple, wholesome ingredients. While it may take a bit more time to prepare than regular murukku, the effort is definitely worth it for the delicious, melt-in-your-mouth crunch.
Jump to:
About Seepu Murukku
Seepu Murukku is a beloved snack from the Chettinad region. It has a delicate texture and unique shape. The name "Seepu" refers to the comb-like design created while shaping the dough before frying. This adds both to the look and the crunchiness of the recipe. This is an authentic chettinad special recipe which I got from my aunt.
This recipe is made with simple ingredients. The dough is made by grinding raw rice, urad dal, and fried gram dal into a fine flour, then mixing it with coconut milk and butter. This blend of ingredients gives the murukku a rich, slightly nutty flavor and a soft yet crispy texture. It is a light yet flavorful snack that's perfect for any occasion.
I've grown up eating chettinad snacks like athirasam, thenkuzhal murukku and seepu murukku throughout my childhood days .When we visit our native town Karaikudi it is a must for us to buy a pack of all these chettinad special snacks and if my mama visits us he brings a pack too.
I have helped amma just for rolling seepu murukku during my school days and I wanted to try this and post it here but all these days I didn't have the proper achu(seepu murukku press) so kept delaying. The seepu murukku press amma gave me was slightly twisted so the seepu murukku tapes were not even, my perimma had sent me the press last week and yesterday I gave it a try. I was so surprised that I got the tapes perfect that even amma appreciated me, yay!! happy me.
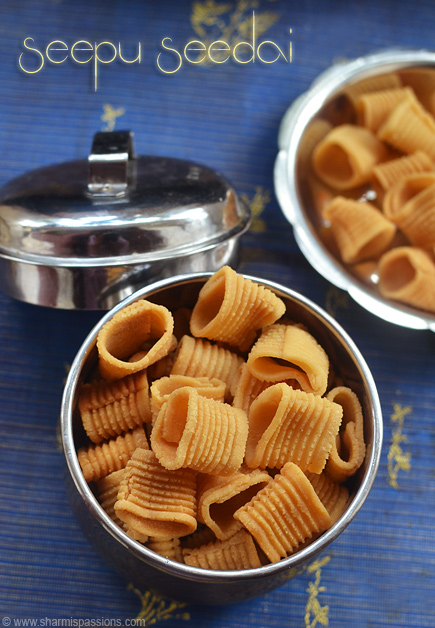
It is a versatile recipe. It's often served as a festive treat, but it's also a great to have it with a cup of tea or coffee, offering a satisfying crunch without being overly heavy. It's easy to store and stays crispy for days, making it a great option for snacking or sharing with family and friends. It brings a sense of tradition and warmth to any gathering.
I have given the steps and detailed instructions so that its easy for beginners to try it. I have also included alternate method for those who don't have the seepu murukku press mold by using a unused new comb. The process of making seepu murukku is sure time consuming so plan your day accordingly, but at the end of the day I am sure its worth the effort.
I love the flavor of coconut milk the best in this seepu murukku. If you ask me, I didn't find any difficulty to make it single handedly - the only thing is it takes time but I loved the making process. it was fun.
Seepu Murukku Ingredients
- Rice - This is the key ingredient, It is soaked in water, drained then grind into a fine flour. Rice flour is the one of the base for this recipe. It adds a soft yet firm dough when combined with the other ingredients.
- Urad Dal - It is roasted and grind to a fine powder. Adds a subtle nutty flavor and is essential for achieving the right texture in the dough.
- Gram Dal - Adds a slight crunch to the dish. It complements the flours and helps balance the flavor and texture.
- Coconut Milk - Adds richness and a mild sweetness to the murukku. It also gives a lovely aroma and helps to achieve a delicate texture once fried.
- Hot Water - Add water gradually to the flour. Adjust the water based on the consistency of the dough to form a smooth, non-sticky dough.
- Butter - It helps to give a soft crunch and melt in the mouth texture to the murukku. It enhances the flavor while ensuring the murukku doesn't become too dry.
- Oil - Used for deep frying. Ensure the oil is at the right temperature to achieve crispy, golden-brown Seepu Murukku.
Similar Recipes
- Thenkuzhal murukku
- Butter Murukku
- Maida Mullu Murukku
- Pottukadalai Murukku
- Potato Murukku
- Rava Murukku
Why This Recipe Works
- This recipe is made with simple ingredients.
- It has a unique texture and flavor.
- Coconut milk adds richness and a pleasant aroma to the dish.
- It's a versatile recipe that can be enjoyed during festivals or as a regular snack.
- It's a perfect snack recipe which stays fresh for days when stored properly.
How to make Seepu Murukku Step by Step
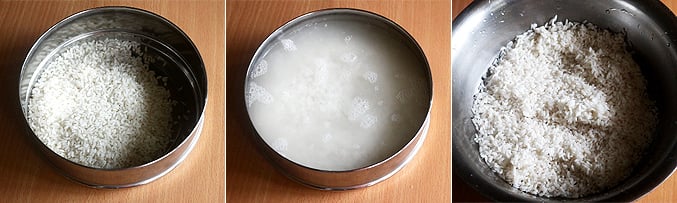
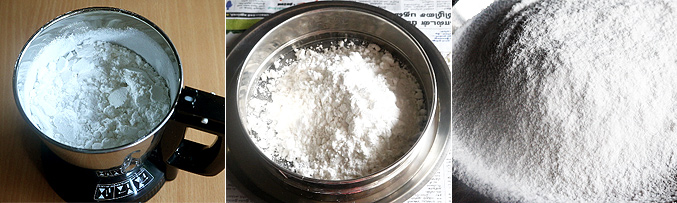
1.First rinse the raw rice twice, and soak it in water for 1 hour. Drain water completely and then spread the raw rice in a soft towel and allow it to dry say for 30-45 minutes. It will be slightly moist only. Then transfer this to a mixer.
2.Then spread the raw rice in a soft towel and allow it to dry say for 30-45 minutes. It will be slightly moist only and few rice will stick to your hands when touch and see, this is the perfect stage. Then transfer this to a mixer.
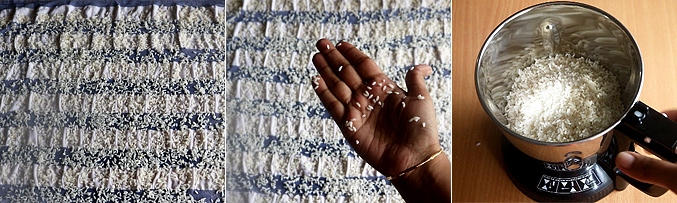
3.Grind to a fine powder. Transfer to sieve. Sieve it well.
4.Take coconut in a mixer, add little water and grind it.
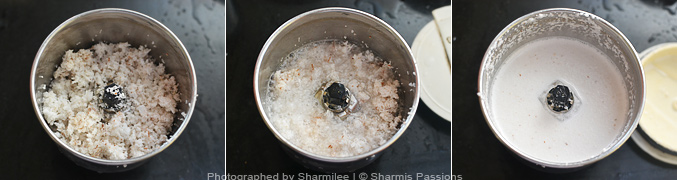
5.Now extract coconut milk, use a strainer to do this.Then dry roast urad dal till golden brown.

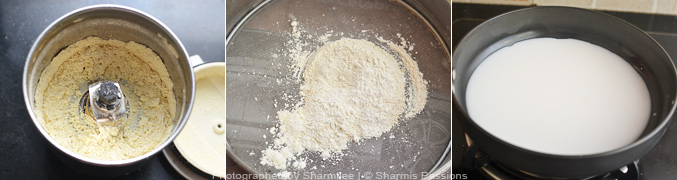
6.Cool down and transfer urad dal to a mixer and grind it a fine powder, Set aside. Take fried gram dal in a mixer.

7.Grind it to a fine powder and Sieve both the flours together. Discard the rava mixture and collect the sieved flour alone. Heat coconut milk for a minute till it gets hot, don't boil just heat it up.
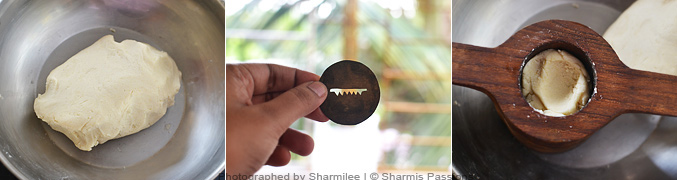
8.Take rice flour, urad dal flour and fried gram dal flour in a mixing bowl, add salt and butter mix well with your hands. Then add coconut milk little by little.
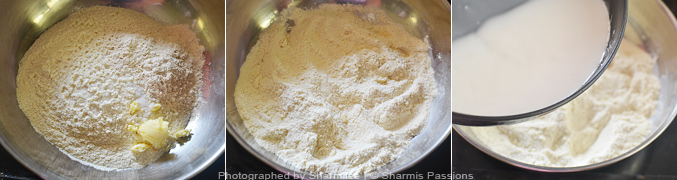
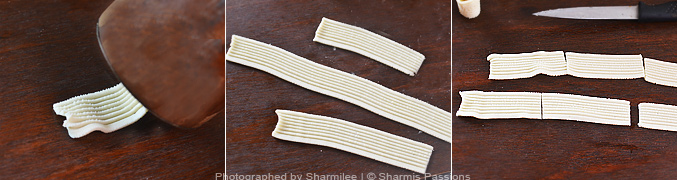
9.Add hot water if coconut milk isn't enough. Form a smooth non sticky dough without any cracks. Take your seepu murukku press. Now fill the murukku press with little dough.
10.Now start pressing them into long tapes then cut them into small strips(around 10 cm) on a big board or your kitchen counter. I used my wooden board.
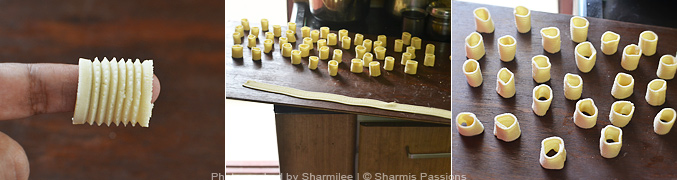
11.Join the ends of the strips around your forefinger to make cylinders like shown below. Gently remove it and place it. Repeat the same till the entire dough gets over.
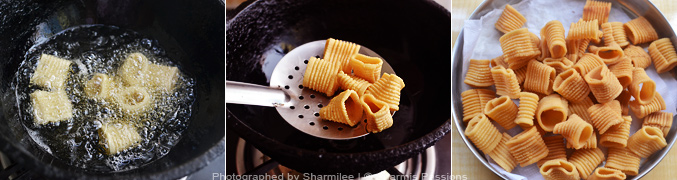
12.Heat oil, to check if the oil is hot just add a pinch of the dough. If it raises immediately then oil is ready. Now carefully add the prepared seepu murukku may be 6-7 at a time and fry till golden brown. Drain in tissue paper.
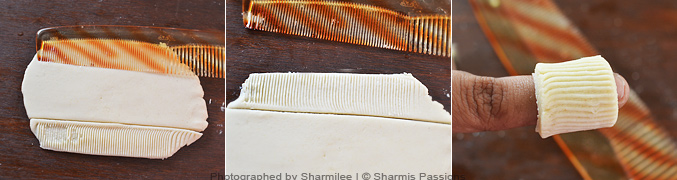
13.This is an alternate method if you don't have the seepu murukku press. but this method using comb is sure time consuming. First grease the board with oil...take a small portion of dough and roll it to 2mm thickness, then use a new unused comb and press it slightly so that the impression is on the thumb. Cut into strips and roll it as mentioned before.
Cool down then store in an airtight container.
Expert Tips
- Grinding - Make sure the rice and dals are ground finely. If the powder is coarse, it might affect the texture and make it hard to press the dough.
- Dough - The dough should be soft and smooth - not too dry or sticky. If it's dry, it may crack while shaping. If it's too sticky, it won't hold the pattern. Add warm water little by little to adjust the consistency.
- Coconut milk - Just warm the coconut milk before adding. Don't boil it - warming the milk helps make the dough soft and easy to work with.
- Frying - Keep the oil at low to medium heat. This helps the murukku cook evenly and turn crisp without burning on the outside.
- Shaping - If you're using a comb instead of a press, grease your working surface well so the dough doesn't stick to it.
Serving and Storage
Serve it warm, it is perfect for tea-time, a festive treat, or a light snack. It pairs well with tea or coffee and is a hit during Diwali celebrations.
You can store it in an airtight container. It stays fresh for up to a week.
FAQS
1.Can I use store-bought rice flour, urad dal flour?
Yes, but the texture might slightly differ from homemade flour.
2.Can I substitute coconut milk with something else?
You can use milk or water, but coconut milk adds rich flavor and taste.
3.Why is the dough breaking while frying?
The dough may be too dry-add little water and knead it smooth.
4.Can I make this in advance?
Yes, the dough can be refrigerated for a day before frying.
5.What if I don't have a Seepu Murukku press?
You can use a clean comb to make the design manually.
6.Can I use ghee instead of butter?
Yes, ghee works well as a substitute in the same quantity.
If you have any more questions about this Seepu Murukku Recipe do mail me at sharmispassions@gmail.com. In addition, follow me on Instagram, Facebook, Pinterest ,Youtube and Twitter .
Tried this Seepu Murukku Recipe? Do let me know how you liked it. Also tag us on Instagram @sharmispassions and hash tag it on #sharmispassions.
📖 Recipe Card
Seepu Murukku Recipe
Ingredients
- 1 cup raw rice
- ¼ cup whole urad dal
- ⅛ cup fried gram dal
- ½ cup thick coconut milk
- 2 teaspoon butter
- salt to taste
- oil to deep fry
- hot water as required
Measure for using readymade flour
- 1 cup rice flour
- ¼ cup urad dal flour
- ¼ cup fried gram dal flour
- 1 teaspoon butter
- salt to taste
- oil to deep fry
- hot water as required
Instructions
- First rinse the raw rice twice, and soak it in water for 1 hour.
- Drain water completely and then spread the raw rice in a soft towel and allow it to dry say for 30-45 minutes. It will be slightly moist only. Then transfer this to a mixer.
- Then spread the raw rice in a soft towel and allow it to dry say for 30-45 minutes. It will be slightly moist only and few rice will stick to your hands when you touch and see, this is the perfect stage. Then transfer this to a mixer.
- Grind to a fine powder. Transfer to sieve.
- Sieve it well.
- Take coconut in a mixer, add little water and grind it.
- Now extract coconut milk, use a strainer to do this. Then dry roast urad dal till golden brown.
- Cool down and transfer urad dal to a mixer and grind it a fine powder, set aside. Take fried gram dal in a mixer.
- Grind it to a fine powder and Sieve both the flours together. Discard the rava mixture and collect the sieved flour alone.
- Heat coconut milk for a minute till it gets hot, don't boil just heat it up.
- Take rice flour, urad dal flour and fried gram dal flour in a mixing bowl, add salt and butter mix well with your hands.
- Then add hot coconut milk little by little. Add hot water if coconut milk isn't enough.
- Form a smooth non sticky dough without any cracks. Take your seepu murukku press. Now fill the murukku press with little dough.
- Now start pressing them into long tapes then cut them into small strips (around 10 cm) on a big board or your kitchen counter. I used my wooden board.
- Join the ends of the strips around your forefinger to make cylinders. Gently remove it and place it. Repeat the same till the entire dough gets over.
- Heat oil, to check if the oil is hot just add a pinch of the dough. If it raises immediately then oil is ready.
- Now carefully add the prepared seepu murukku may be 6-7 at a time and fry till golden brown. Drain in tissue paper. Seepu murukku is ready!
Alternate Method if you do not have press :
- This is an alternate method if you don't have the seepu murukku press, but this method using comb is sure time consuming.
- First grease the board with oil - take a small portion of dough and roll it to 2 mm thikness, then use a new unused comb and press it slightly so that the impression is on the thumb.
- Cut into strips and roll it as mentioned before. Cool down and store Seepu murukku in an airtight container.
Notes
- Grinding - Make sure the rice and dals are ground finely. If the powder is coarse, it might affect the texture and make it hard to press the dough.
- Dough - The dough should be soft and smooth - not too dry or sticky. If it's dry, it may crack while shaping. If it's too sticky, it won't hold the pattern. Add warm water little by little to adjust the consistency.
- Coconut milk - Just warm the coconut milk before adding. Don't boil it - warming the milk helps make the dough soft and easy to work with.
- Frying - Keep the oil at low to medium heat. This helps the murukku cook evenly and turn crisp without burning on the outside.
- Shaping - If you're using a comb instead of a press, grease your working surface well so the dough doesn't stick to it.
AparnaRajeshkumar
great post with so many details and explanation with load of tips and video .. Loved it
priyaah
My favorite Adayar anandha bhavan snack. Perfectly done. Super...
priya ravi
Sharmi, too gud.. Looks the same as in karaikudi..
mullai
Hats off for such a painstaking post ,,so much details
Happy Deepavali
Jayanthi Sindhiya
I have never had these, they look so cute...nice clicks!!!!!!
Pari Vasisht
Sharmi, these look beautiful and you have explained it really well.
Divs
I have never tasted this ..your clicks are tenpting me badly to savor these crispy golden rings..
Preethi G
Omg! Such a lengthy procedure!!!
JD
nice illustration...and a great attempt to bring up the tamilian/south Indian food recipes in an excellent way....keep up the good work,............
JD
very nice illustration....keep up the good work....
Rozaline Janci Rani
I love all your recipes. I tried the seepu Seedai and it would break and I could not turn it around my finger and join the 2 ends. Could u pl. let me know what I could have done wrong.
SHARMILEE J
If it breaks then there is some problem with the dough made either it must be too loose or too tight...adjust according to it and then try.Check my notes for more details
Rozaline Janci Rani
very nice recipe
Shobana
Enga vangalam seepu seedai mould..
Sharmilee J
Try in supermarkets or local stores
subha
hi..
after grinding he rice and the dals what measurement should i take from the grounded powders. should i take the whole powder and sieve it and use.
Sharmilee J
yes take the whole sieved flour
Jayashree
I made this for my nephew who is teething. He wears it on his fingers and rubs his gums with gusto. It came out very well. Thank you for your recipe.