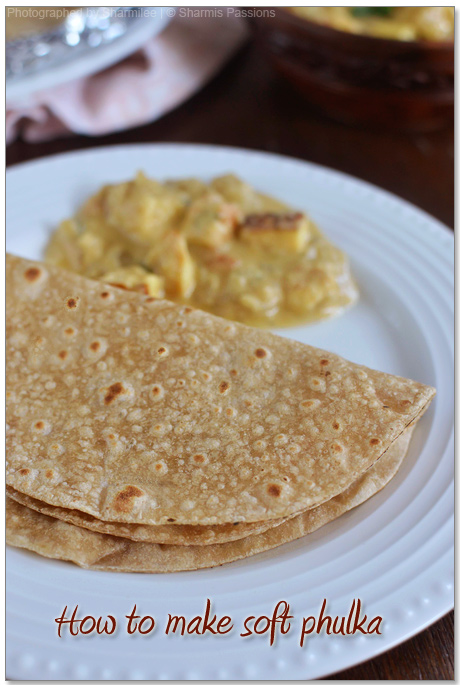
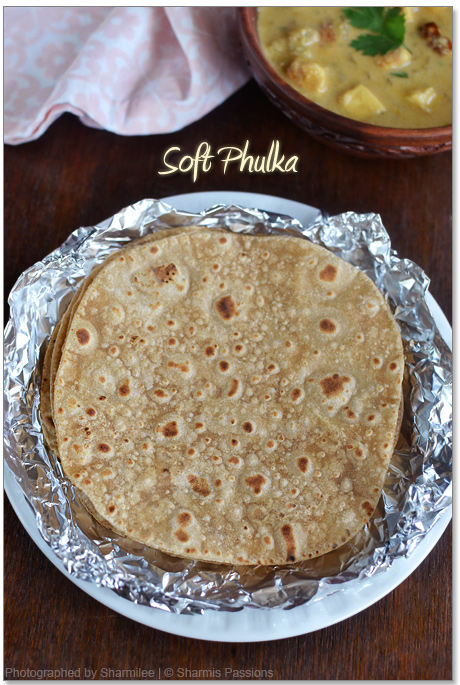
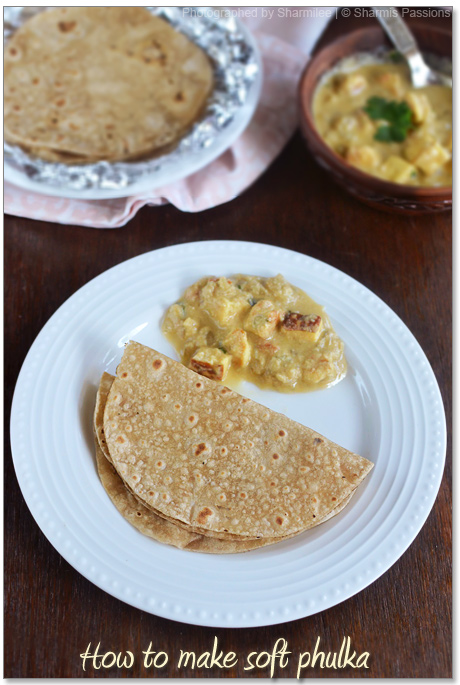
Phulka is a soft Indian flat bread made by directly cooking it in open flame. Phulka does not or use very less oil or ghee compared to regular chapati so healthy too. Phulka is soft compared to roti and savored along with gravy or curry or raita or pickle. Learn to cook phulka with step by step pictures.
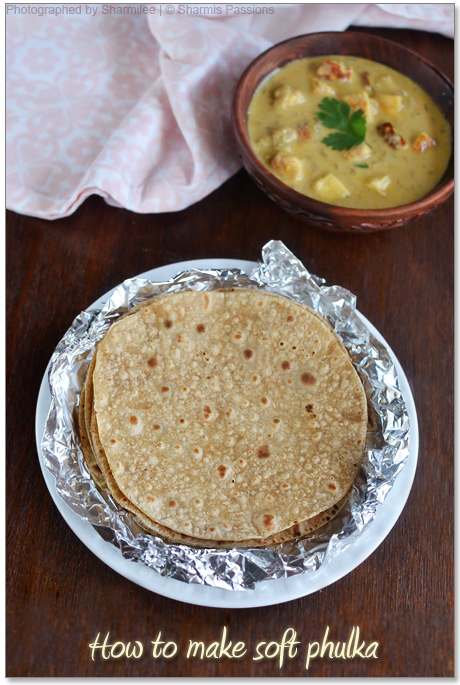
Phulka is one of the staple food in North India. It is like our regular chapati but small and thin most commonly served with ghee smeared. Kids will love phulka as it is very soft, do try this and enjoy at home.
Jump to:
About Phulka
Phulkas / Pulkas are nothing but Indian flat bread half cooked in tawa and directly in open flame. It is normally dry and prepared without adding any ghee or oils p healthy too. It takes time and practice to get it right.
Years back, I tried puffing roti but gave up as I didn't get it right. Finally one day I asked my North Indian neighbor and learnt that the trick is in rolling too, the rotis should be rolled thin even on all sides else the rotis will not puff up fully. Now I can confidently say I'm getting it right yes each time. Seeing the roti puff up takes chapati / roti making to a whole new level and mittu loves these phulkas is another added happiness.
Similar Recipes
Phulka Ingredients
- Wheat flour - You can use homemade wheat flour or store bought wheat flour too. You can even use multigrain atta.
- Salt, water - Salt is added for taste. Water is added to knead the dough.
- Oil - Oil is added to make phulka soft.
How to make Phulka Step by Step
1.In a wide mixing bowl add wheat flour, salt and first give a quick mix for salt to be even. Then add water little by little, gather to form a soft pliable dough. Once it is gathered to a mass add ½ teaspoon oil and knead it. The dough should not be too tight or too loose, it should be non sticky at this stage.
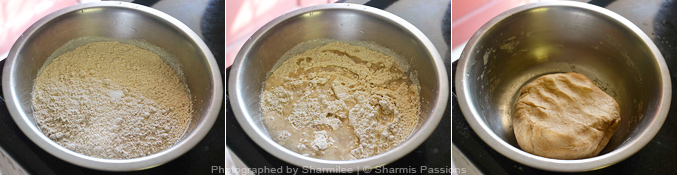
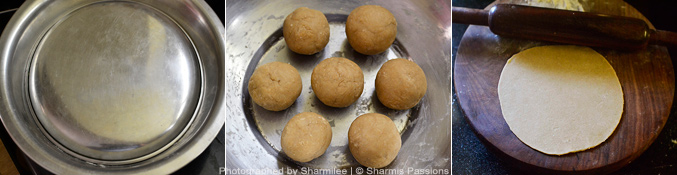
2.Keep closed aside for 15-30 minutes. Open and knead it again and form lemon sized balls(the size depends on your preference). Roll each ball into thin circles(rolling should be even).Dust flour if required but don't add more flour while rolling.
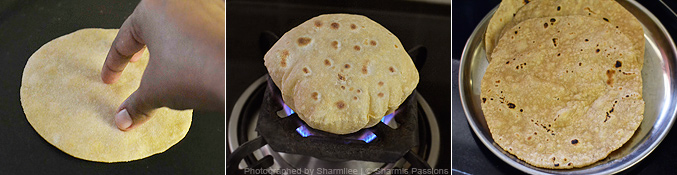
2.Heat tawa, keep in medium flame - add the roti and wait till small bubbles appear, then flip to other side wait for few mins till golden spots appear. Then carefully transfer it to the flame(let it be in high flame)directly using a tong. Let it puff, then carefully transfer to hot pack. Repeat the same procedure for all other rotis. Brush it with oil/ghee if you prefer.
This way the rotis will stay soft for more hours. You can even use the chapathi/roti griller for making rotis this way. Hope the video will help beginners who want to try this.
Expert Tips
- While transferring the rotis to direct flame, make sure the flame is high. Also the side that is not cooked to golden brown should be facing down under direct flame.
- I am sure this will come by practice but don't worry even though, if it doesn't not puff up like mine, am sure the rotis will be very soft.
- Make sure to roll thin and evenly. It should not be too thin as transparent to other side.
- While kneading make sure to add correct quantity of water and knead well to form a soft pliable dough.
- Don't be tempted to add in more flour while rolling, as we are not adding any oil and if you add more flour while rolling the rotis will be very dry and also taste raw.
- Use a tong and be very careful while taking out without tearing the roti 🙂 as I personally had this problem in the earlier days while I started making them.
- The size of each roti is purely your preference but make sure the roti is big enough to fit inside the flame , the sides which are not exposed will not puff up so roll it accordingly.
- This way you can totally cut down oil and still the chapathi stays soft for hours and best for packing too.
- Once the rotis are done, brush it with ghee / oil and transfer it to a hot pack and wrap it in a kitchen towel / tissue which will keep it hot and soft until serving time.
Serving and Storage
Serve phulka with gravy or curry or raita. You can store phulka in room temperature for about 2 days. But you can store the wheat flour dough for about a week in fridge.
If you have any more questions about this phulka recipe do mail me at sharmispassions@gmail.com. In addition, follow me on Instagram, Facebook, Pinterest ,Youtube and Twitter .
Tried this phulka recipe ? Do let me know how you liked it. Also tag us on Instagram @sharmispassions and hash tag it on #sharmispassions.
📖 Recipe Card
Phulka | How to make soft phulka
Ingredients
- 1 cup wheat flour
- salt to taste
- ½ cup water
- ½ teaspoon oil
Instructions
- In a wide mixing bowl add wheat flour, salt and first give a quick mix for salt to be even. Then add water little by little, gather to form a soft pliable dough. Once it is gathered to a mass add ½ teaspoon oil and knead it. The dough should not be too tight or too loose, it should be non sticky at this stage.
- Keep closed aside for 15-30 minutes. Open and knead it again and form lemon sized balls(the size depends on your preference). Roll each ball into thin circles(rolling should be even).Dust flour if required but don't add more flour while rolling.
- .Heat tawa, keep in medium flame - add the roti and wait till small bubbles appear, then flip to other side wait for few mins till golden spots appear. Then carefully transfer it to the flame(let it be in high flame)directly using a tong. Let it puff, then carefully transfer to hot pack. Repeat the same procedure for all other rotis. Brush it with oil/ghee if you prefer.
- This way the rotis will stay soft for more hours. You can even use the chapathi/roti griller for making rotis this way. Hope the video will help beginners who want to try this.
Notes
- While transferring the rotis to direct flame, make sure the flame is high. Also the side that is not cooked to golden brown should be facing down under direct flame.
- I am sure this will come by practice but don't worry even though, if it doesn't not puff up like mine, am sure the rotis will be very soft.
- Make sure to roll thin and evenly. It should not be too thin as transparent to other side.
- While kneading make sure to add correct quantity of water and knead well to form a soft pliable dough.
- Don't be tempted to add in more flour while rolling, as we are not adding any oil and if you add more flour while rolling the rotis will be very dry and also taste raw.
- Use a tong and be very careful while taking out without tearing the roti as I personally had this problem in the earlier days while I started making them.
- The size of each roti is purely your preference but make sure the roti is big enough to fit inside the flame , the sides which are not exposed will not puff up so roll it accordingly.
- This way you can totally cut down oil and still the chapathi stays soft for hours and best for packing too.
- Once the rotis are done, brush it with ghee / oil and transfer it to a hot pack and wrap it in a kitchen towel / tissue which will keep it hot and soft until serving time.
VTU-ENotes
adding milk while making dough..makes roti softer..
Nivedhanams Sowmya
very helpful and informative post!!! thanks for sharing and your tips are soooo good!!!
Sangeetha Nambi
Super softy roti...
APARNARAJESHKUMAR
very nicely captured !
Veena Theagarajan
super soft roti
Shobha Kamath
Nice pics !
Vaishnavi
Very useful post. 1 small tip too..The rolled dough should be even without any holes or unevenness. This will make the phulka puff up well
Arthy Suman
Very healthy chapati...
Rama Sekharan
I was from Madras when I got married a North Indian (Southerner moved & lived in North)49 years ago. Did not know how to roll the roti's even. With practice now I can make Phulka's that always puff, any kind of paratha's. The only trick that I know for sure is to keep trying & not give up. It becomes a habit that is hard to break. Good luck to all southie's like I was.
ANU
awesome dear...u did perfect on making THE perfect pulkas....congrats!!
Gauri
Perfect phulka.. u make it look so easy 🙂
Chitra
Perfect,,i get it right sometimes .As u said its on rolling too :)Nice post & video too 🙂
Leena
Healthy and comforting phulkas...
RAKS KITCHEN
looks soft and we always love this a lot compared to the oily chapathi.
Zareena
Perfect rotis. I too make phulkas on stove top. Your step by step pics are very helpful. Thanks for sharing.
Priya
Love this soft phulkas, my fav..But unfortunately i dont have gas stove here,mine is electric:(missing it.
M D
Lovely looking rotis. Absolutely great with any kind of curry!
Vardhini
Nice video Sharmi. I remember how excited I was when I got the pulkas to puff up initially 🙂
Jayanthi Karthikeyan
useful post.
Poornima Porchelvan
very informative.
David Riley
Found this recipe just browsing the web but sounds great will be trying this one,
arasu
Thanks , it is so easy to understand by your videos and pics along with.
Thanks a lot
Saranya Satish
All ur recipes are awesome n mouth mouth watering
sucheta dalvi
Dear Ms. Sharmilee, Please also post how to cook Daal (tuar daal)and rice in a pressure cooker (together). This is also one of the basic step required to be understood by beginners
SHARMILEE J
Sure will do it in future...
sucheta dalvi
Dear Sharmili, please post how to cook daal, rice , and steam chick peas, palak, potatoes in pressure cookers. I am waiting for your post. I am not able to steam potatoes, spinach or chickpeas, nor can I cook rice or daal in cooker, have to depend on microwave for that.
SHARMILEE J
Sure will do that in future
Sakthi Krishna
I m gonna try this now...
Ruwani Kumar
Hi Sharmilee ,
Love your blog ! Thank you for sharing all your recipes with us.:)
The title on top of the recipe says Paneer Butter Masala without saying Soft phulka. Hope you did't mind me pointing out to you.
SHARMILEE J
Oh np at all... thank you for notifying...yes that was a typo...corrected it now 🙂
Kalpana Devi
Hello Ms. Sharmilee I have trying many recipes frm your blog...... many tips and informative ....... easy to understand and eager to try out....... I have been trying looong time to make puff rotis ...... my question is will this work only in gas stove tops ...... wht abt coil ones ..... pls reply.
SHARMILEE J
What is coil tops? not sure Kalpana...may be you can get that roti making wirerack kind
Senthamilselvi
Coil top is a kind of electric stove. Yes, like you said we can get wire rack kind but the one I got from India almost burns the phulka. So what I did is, we get good steel racks in the microwave oven and used that on the coil top. If not, better to turn it on the same pan and I have seen my friend doing it!
Jo Mar
Wow very nice tips thank you so very much, me being an european maried to an indian I like to know how to cook indian dishes, as I love them too. Thanks a lot for your post 🙂
Kavitha
I want to make phulkas for lunch box and no time to knead the dough in the morning.. i tried doing it in the previous night and storing in tight polythene covers/tupperware etc.... but its does not remain soft and always hard.. any idea for this??
SHARMILEE J
Havent found such an issue so far....As for mostly for travels I knead the dough prev night itself and make phulka in the mrg...may be add little ghee while packing the phulkas
Bikram Jit
I really like tricks. I hope it would help me next time.
Yesterday first time I tried to make chapatis. But most of them didn't puff fully.
sundar maggi
I got tiny black spots in my roti than usual golden brown like yours. Other than that it came out really good. Thank u so much. Can u pl tel y I got black spots and how to rectify it.
SHARMILEE J
Just few seconds, you should take it out....else it will get burnt
Sundara Moorthy
I have tried doing pulkas as you have did..
was being successful in making them out fluffy..
But my only concern and doubt is that we shouldn't cook chapathi directly over gas flame. It seems it may lead to cancer and other toxic effects in our body.. is that true?? do state the truth..
SHARMILEE J
I have the same concern too but not really sure as some say its not healthy but when I asked my north indian friends they say, they do it for so many years...so its our wish to continue making or not
Khushboo Pandey
I learned to make phulkas last year only and mom tought me with very ease... It's not actually how rolling goes but rolling evenly is also important along with a well kneaded dough ... I enjoy making phulkas ever since I learned.
jith
Nice Blog thanks for sharing. I made chapati by using Surabhi atta. Which is very tasty.
Nimmi Maanu
Hi,your recipes are very informative and thanks for sharing with us.your images are making me mouth watering.i have a small tip too.use hot water instead of cool water resulting very soft chapathi
sindhu dhinesh
hai.can u plz tel me d method 2 keep d dough for 2 3 days .if we keep it in fridge it gets hard and tight.incase if we have extra dough how shd v preserve
thank you
Sharmilee J
You can keep in a dry airtight container and keep in fridge.30mins before rolling keep the dough outside then use it.
sindhu dhinesh
thank u so much...:)