How to make Paneer at home | Homemade Paneer
How to make Paneer at home is explained in this post with step by step pictures. Paneer is a soft, spongy cottage cheese made by curdling milk to cheese with lemon extract or curd and refrigerating it. Paneer is a versatile ingredient for making it as a starter, gravy, filling for rolls and as snack.
Servings1 cup
Ingredients
- 1 litre milk
- 1/2 cup curd or 3 tablespoon lemon juice or 2 tablespoon vinegar
Instructions
- Boil milk for 5mins (Simmer it). Let it for a gentle boil then first add 1/4 cup of curd, keep stirring and then add the next 1/4 cup.
- Continue heating till it starts curdling, keep stirring until the whey completely seperates.At this stage, switch it off. If you are adding lemon, add it 1 tablespoon by 1 tablespoon.
- Place a cheesecloth (make sure it is long enough to get tied up) over a container and strain the paneer. If you use lemon juice to curdle just wash it twice at least, in cold water to get rid of the lemon flavour. Bring the edges of the cloth to the center, tie and hang it to a handle or sink tap. Allow the water to drip by itself, do not disturb the setup for an hour till all the whey completely drips.
- Flatten it and place it on a dosa tawa. Then keep the chapathi maker over it and any other heavy weight over the chapathi maker (I kept my hand mortar and pestle). Allow it to get set for atleast 2 to 3 hours. It will look cruumbled at this stage but dont worry it will get set well.
- Then carefully remove the cloth from the paneer and place it in the fridge for 1 hour at least (this step is optional but helps in getting clean neat pieces while cutting). I let it sit in the fridge overnight as anyways I cannot night shoot it...yes I made it it the previous night making the paneer ready for next days clicks :) Then, remove it from the fridge , and cut into desired cubes.
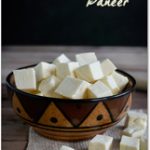
- Do not freeze it. Just refrigeration is enough. Cut into cubes of your preferred size and store in a airtight container / a ziplock cover. Homemade Paneer Ready!
Notes
- I prefer to cut them a bit small so that while added to gravies, it absorbs well. Soaking the paneer 10mins before adding it to gravies also makes it to absorb the gravy well. You can store in fridge for up to 3 to 4 days....After that it starts to harden.
- Use the leftover whey for making rotis or rasgullas or save it for making paneer next time.
- Setting time is very important in getting the perfect paneer cubes. Also keeping in fridge before cutting into cubes gives neat pieces.
- You can even use 1/4 cup curd to curdle but I used 1/2 cup to curdle quickly and to get little more volume of paneer.
- I used cows milk so had to simmer for a while before I added curd as cows milk is little watery. People here in India can use aavin full cream milk.
- Use a cheese cloth which drains the water well. I used dhoti cloth for draining.
- Take care to wrap it to form a circle / square so that while cutting into pieces it is easy to form squares.
- Also allow the paneer to come to room temperature before cutting it to avoid paneer from crumbling.
Nutrition Facts
How to make Paneer at home | Homemade Paneer
Amount Per Serving (200 g)
Calories 694
Calories from Fat 333
% Daily Value*
Fat 37g57%
Saturated Fat 22g138%
Polyunsaturated Fat 1g
Monounsaturated Fat 8g
Cholesterol 140mg47%
Sodium 448mg19%
Potassium 1737mg50%
Carbohydrates 54g18%
Sugar 55g61%
Protein 38g76%
Vitamin A 1792IU36%
Vitamin C 1mg1%
Calcium 1417mg142%
Iron 0.1mg1%
* Percent Daily Values are based on a 2000 calorie diet.
Tried this recipe?Mention @sharmispassions or tag #sharmispassions
Like our video?Subscribe to our youtube channel to get latest updates!